The Swellendam 5 Day Hiking Trail – A Magical Mountain Adventure
The Swellendam Hiking Trail
A Magical Mountain Adventure
It’s been a long period of quiet from our side, and on writing this post, we realised it has been 2 years since our last multi-day hike. We have done several other overnight hikes (like Arangieskop and the Cape Point overnight hike) in between, but nothing new that required a blog post. We usually average two multi-day hikes per year, but with a move to a new part of the province at the end of 2019, as well as the restrictions placed on activities due to Covid-19, this was the first time in a while that we felt we could safely break out our hiking supplies and hit the mountains for more than just a couple of days.
We were scheduled to hike Fish River Canyon again during the second week of May 2021, but with the uncertainties of border closures, the added expense of Covid tests, and the fact that all SAPS group sports are still not permitted (of which, our hiking club, SAPSTAP is considered one), we decided to pick a local trail instead, and we moved our booking for Fish to May 2022 (We are EXCITED!). The Swellendam Hiking Trail seemed an obvious choice. We rallied a group of 10 friends together and enjoyed 5 days of mountains, rivers, waterfalls, and laughter.
The Swellendam Hiking Trail is located inside the Marloth Nature Reserve, just above Swellendam in the Western Cape. Swellendam is the third oldest town in South Africa and was established in 1745 by the Dutch East India Company when it declared it a magisterial district. It currently has around 20 000 inhabitants and boasts over 50 provincial heritage sites. It is positioned on the N2 highway between the Langeberg Mountains and the Breede River around 220km from the coastal cities of Cape Town and George. It’s nestled almost perfectly in the middle of where most of the Western Cape SAPSTAPers live. The greater Swellendam area consists of six smaller towns including Buffelsjags, Cape Infanta, Malgas, Suurbraak, Stormsvlei and Barrydale. These are all small towns that we really want to explore more in the near future.
While we had both heard of the Swellendam Hiking Trail, we only knew a couple of people who had actually hiked it – and they had done it quite some time back so their recollection of the trail was a little iffy. The trail itself has also changed a lot over the last few years, with route deviations, new huts (and old huts) so we thought we would tackle it ourselves.
Not much is available about this hike on the usual hiking pages, except a 2017 review by Hiking South Africa, a short synopsis on Trip Advisor and some other travel sites, and a 2006 review by Gavin Blakeman. Even the CapeNature website had limited information. Whilst these were able to give us a rough idea about the trail, all of these resources had fairly outdated information so we weren’t able to do as much research into the route as we usually do. On booking the trail, we were provided with some route info, do’s and don’ts for hiking and what to do in case of an emergency in the mountains. Much of the route information was not correct, or too simplified. We are going to provide Cape Nature with new information relating to the huts and the route so that future hikers can be more prepared for this pretty arduous trail.


RATES AND HOW TO BOOK
The Swellendam Hiking Trail is a 5 day/4 night trail (Note: The 6-day trail option is no longer available).
It is a flat rate of R1040 per person (as opposed to a daily rate as advertised on other platforms).
The trail can be booked through Cape Nature by emailing [email protected] or calling the Cape Nature Contact Centre on 087 087 8250. We found both platforms extremely user-friendly.
The minimum number of hikers per booking is 3, maximum is 10.
ACCOMMODATION OPTIONS
Accommodation in Marloth Nature Reserve
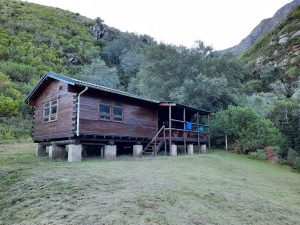
Marloth Nature Reserve has two self-catering cottages, namely Bushbuck (sleeps 6) and Suikerbekkie (sleeps 4). These can be booked for the night before you start your hike so that you are already in the reserve when the gates open. The cottages offer hot showers, warm beds and a fully equipped lounge and kitchen (more info on the facilities on offer can be found here). If you do want to stay in these huts, you can book them at the same time as you book the hike. Alternatively, you can book online on their website. There are peak and off-peak rates, as well as conservation fees to be paid. Rates per person differ for each of the cottages and are also dependent on how many people are booked into each cottage. (Note: Glenstroom hut is not available to book anymore, despite what you may read on other platforms).
Other nearby Options
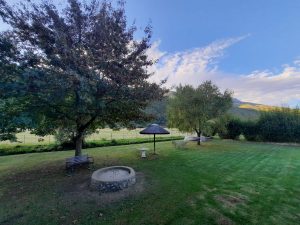
We had booked both of these huts, but unfortunately, one had a leaking roof so Cape Nature cancelled our booking. We decided instead to sleep outside the reserve at a magical place called Frog Mountain. What. A. Find. This is the best value-for-money, view, facilities, attention to detail place that we have stayed at in a long time. It’s only 18km from Marloth Nature Reserve and was absolutely perfect for what we needed. You can have a look at their website here. Whilst we have no affiliation to Frog Moutain, we highly recommend staying there – even for a weekend away. What’s even better is that there are several day-hike options that start right from the gate of the house. We will definitely be back!

THINGS YOU NEED TO KNOW BEFORE THE HIKE:
Group size: The group must be a minimum of 3 and a maximum of 10 people. Even though some of the huts have more than 10 beds, they will not let you add more than 10 people to the group when you book (don’t bother asking, we tried…)
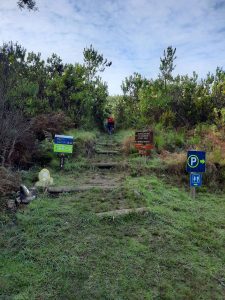
Opening Time: Marloth Nature Reserve opens at 07:30. You will need to complete the mandatory Covid-19 screening at the main office, and all drivers will need to sign in with the Duty Manager (Mr Henry van Tonder) as well. You can park your cars in the reserve, just near the offices, where they will be safe until you return from your hike.
Briefing before the hike: Henry (or one of his appointed staff) will give you a briefing on what to expect during the hike, along with any weather warnings (although you should check the weather before you go to make sure you are properly prepared). Grab a map at the office as well, it helps for navigating each day. They are busy updating the maps, so the distances are incorrect (use our blog for correct distances) – but it is really helpful to have the elevation profiles for each day. Allow at least 45 minutes for the sign-in, toilet-break, car-parking and bag-repacking that will all happen before you actually start hiking.
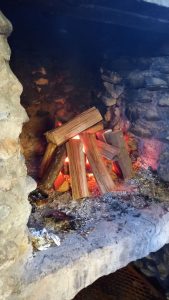
Fires: A fire can only be made on the last night of the hike, at Wolfkloof Hut. At the time of publishing this, the farmer (William) can be contacted for firewood supplies. Henry van Tonder will provide you with William’s contact number at the briefing. Note: No fires are allowed at any of the other huts due to the high run away fire risk, and inaccessibility of the huts.
Escape Routes: Escape routes are only available at the end of days 2 (Goedekloof) and 4 (Wolfkloof). There are no other escape routes available on the hike. Protea Valley hut (at the end of Day 3) is the most remote of all the huts and the least accessible.
Cell Phone Reception: There is patchy cell phone reception along the hike, and at all of the huts except Day 3 (Protea Valley Hut). Put your phone onto roaming before you start, to maximise your chances of having reception. Alternatively, switch it to airplane mode to conserve battery and really get away from the hustle and bustle of normal life (We are sure those emails can wait).
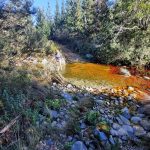
Ablution Facilities and Water: There are eco-toilets (long-drops) at all the huts. There are only cold-water showers at the end of days 2, 4 and 5. Day 1 and Day 3 both have rivers nearby where you can collect water as well as clean yourself. Be prepared for either a rather smelly 5 days, or being willing to shower in freezing cold water… there are pros and cons to both. All of the huts have access to fresh water – be it from the river, or from the JoJo tanks. It is not necessary to take water purification tablets with you.
Water along the trail: There are some water points along the trail each day, but these depend very much on how much rain the area has had. We recommend filling your water bladder or bottles with at least 2L of water for each day, in case the streams are not at full flow.
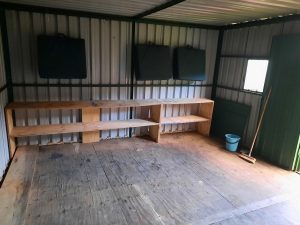
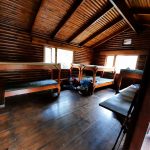
Huts: It is not necessary to take a hiking mattress with you on this hike (despite the information provided by Cape Nature and other platforms). All the huts have mattresses (including Boskloof, which consists of 2 metal structures with wooden floors). All of the huts have a different layout and setting. It is nice to have something new to look forward to at the end of each day.
Essential Equipment: A rain jacket, a headlamp, shoes/boots with good grip and a hiking pole are absolute essentials on this hike. With the change in altitude and the change in weather, you can get very cold, so make sure you have something warm and wind-proof. The hiking pole will be a lifesaver on the long uphills and steep downhills (especially on Day 4). Don’t leave any of these at home. A headlamp is needed as there is no light at the huts (and if you leave early/arrive late when the sun isn’t around anymore). You need shoes with good grip as the terrain is uneven in a lot of places. Add a bit of rain or mud to this and you will be grateful for the extra grip.
Level of Fitness: You need to be relatively hiking-fit for this 5-day mammoth. The uphills and downhills are steep, so make sure you (a) don’t have knee problems, or (b) if you do have knee problems, do some strength training beforehand, and make sure to bring along some kinesiotape or a knee-guard.
Refuse: You need to take any rubbish you accumulate on Day 1, with you on Day 2 – the same goes for days 3 and 4. There are only bins available at the huts on days 2 and 4. Please DO NOT litter on the trail. We sadly saw a few instances of littering and it really is not necessary. If you pack well, you should not accumulate too much rubbish in a day, and even then, it should be light and easy to carry to the next hut.
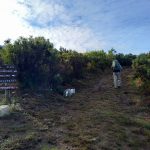
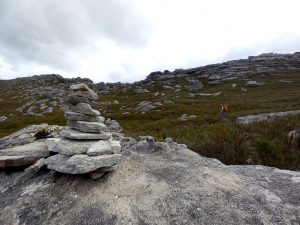
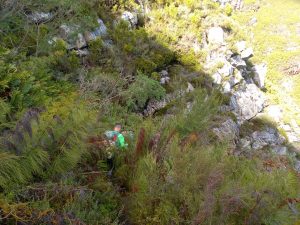
Trail Markings: The trail is marked with painted shoeprints, however, these are only prevalent on days 1 and 5. On the other days, there are cairns to lead the way in some places, but the path is relatively clear and easy to follow. The ceramic distance markers along the route are not always accurate and should only be used as a rough guideline.

This post is divided into two parts. The first section (TL;DR) will include a summarised version of each day, for those who don’t have a lot of time on their hands but need to know the essentials. The second section (The Nitty Gritty) is written in more detail.
THE NIGHT BEFORE THE HIKE
As mentioned above, our booking at the Marloth Nature Reserve cottages was cancelled due to a leaking roof, so we booked into Frog Mountain. It is never easy finding a place for such a large group of people, that is not either hellishly expensive, or isn’t a dormitory. Frog Mountain is definitely an absolute gem of a find.
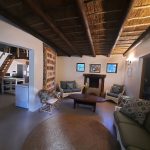
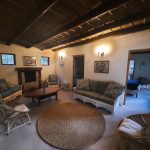
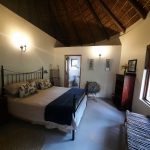
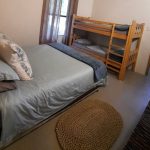
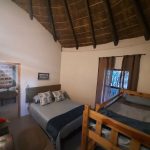
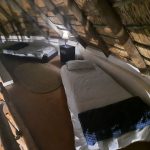
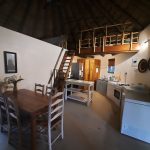
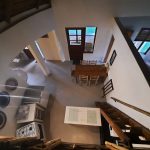
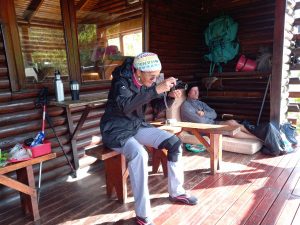
We stayed in Willow cottage at Frog Mountain. It is a large house, with 2 ‘rondavels’, joined in the centre with a large kitchen, dining room and lounge. It has 3 bedrooms and a loft and sleeps 10 people comfortably. There is an indoor fireplace, an outdoor braai and a firepit, and what appears to be the makings of an outdoor jacuzzi. We arrived before any of the others, so got to scout out all the rooms and see what was available. Each room (except the loft) has an en suite bathroom with a basin, toilet and shower. The rooms are large with beautiful views of the garden and adjoining farm. The small finishing touches and the decor really appealed to us. We really wished that we had booked a few extra nights there.
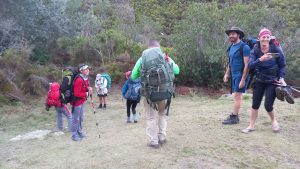
Since most of us had not hiked in such a long time, the cogs were a little rusty. People were worried that they had packed too much clothing and too little food. We had packed our bags at home before embarking on the trip, meticulously weighing everything to keep our bags as light as possible without compromising on the essentials. Most of the rest of the group decided to pack (and unpack and repack) their bags at Willow cottage, resulting in a lounge filled with hiking equipment and stories of who bought what food at which supermarket. Having the group together the night before the hike definitely added to the ‘gees’ of the experience and certainly increased excitement levels for our journey the next day.
Once we had all done a final pack and weigh-in of our backpacks, we settled down to dinner and then a long catch up around the fire-pit. It’s nights like these that will be cemented in our memories forever. We have such a great group of hiking friends, and we were so grateful to be able to spend time with them and catch up after what was a difficult few months for many.


Part 1: TL;DR
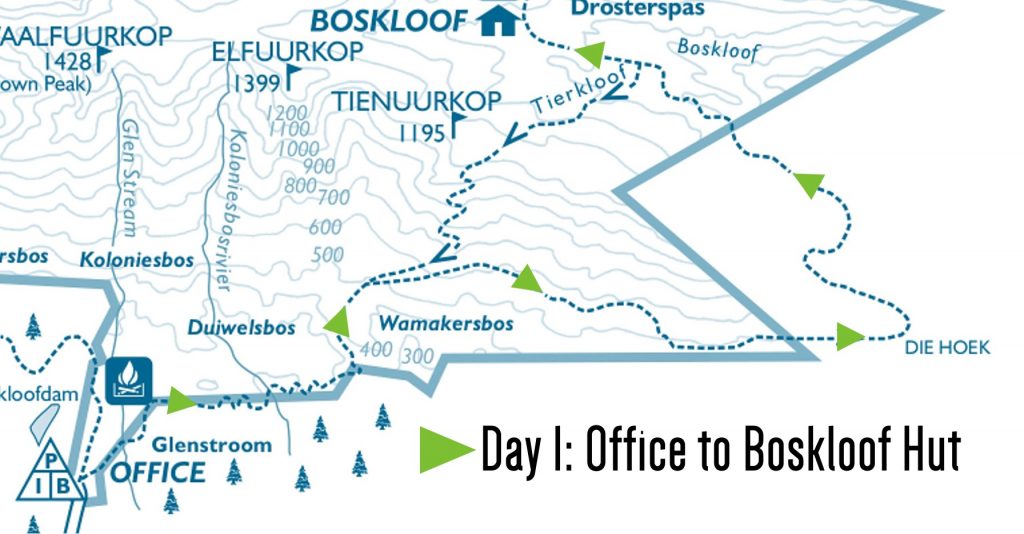
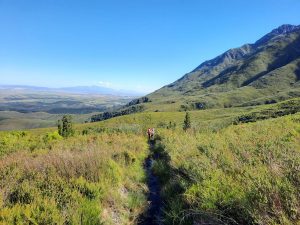
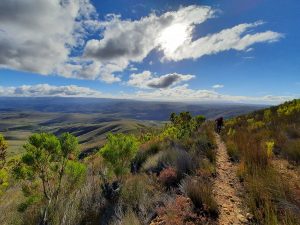
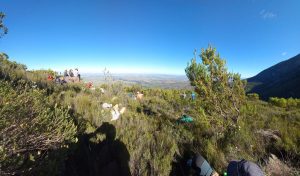
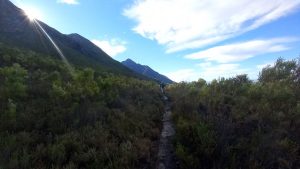
DAY 1: MARLOTH NATURE RESERVE OFFICE TO BOSKLOOF HUT (± 15.7 km, ± 7 hours)
Day 1 is the hardest day. It is also one of the longest, at ±15.7km (±7 hours). You will need to leave as soon as you can from the Marloth Nature Reserve Office. The reserve opens at 07h30 – give yourself at least 45 mins to 1 hour to sign in, move cars and rearrange bags, as well as enjoy the briefing from the Duty Manager. You have a long day ahead of you, and you need to be on the trail by 08h30.
Your bag will be at its heaviest and the terrain on Day 1 is not to be laughed at. If there has been any rain in the preceding days before you begin your hike, be prepared for a slippery experience. This means you need to walk more slowly so that you don’t fall, which also means more time on the mountain. Pace yourself. Take enough water (2L minimum) and snacks for at least 7 hours on the mountain.
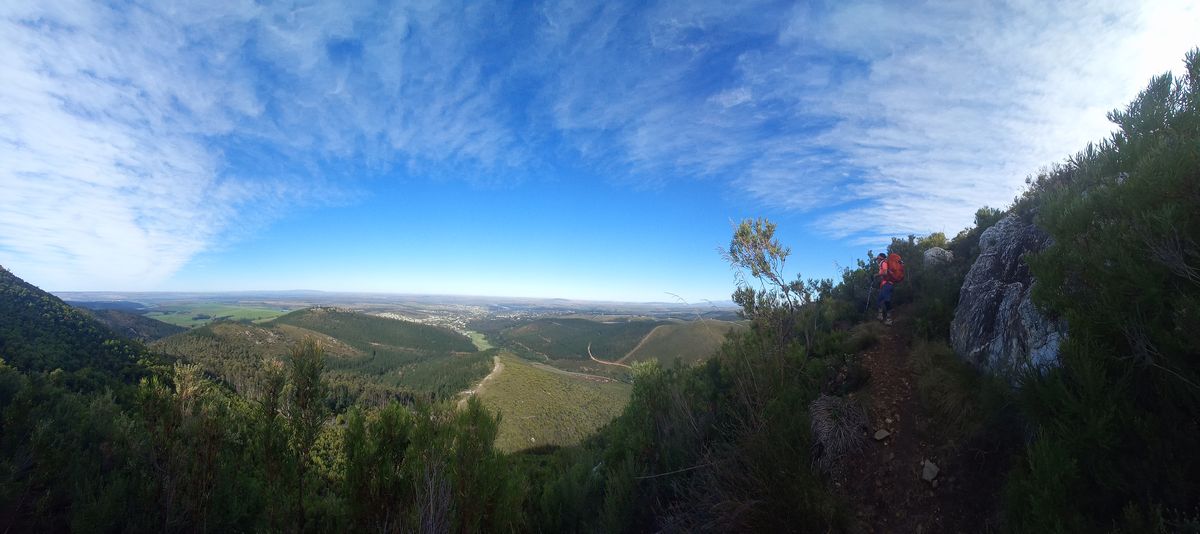
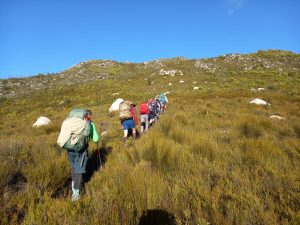
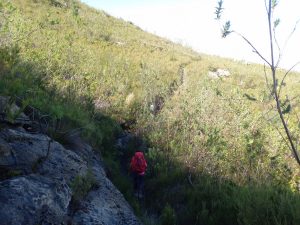
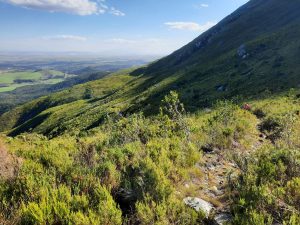
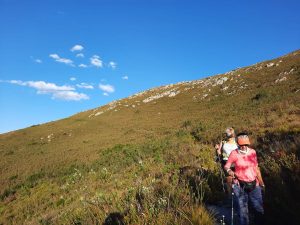
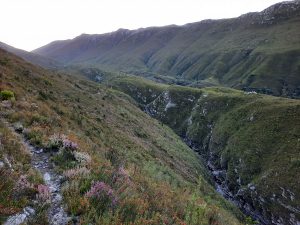
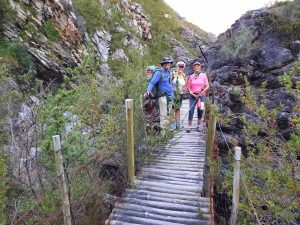
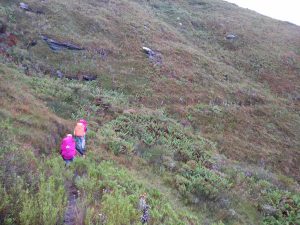
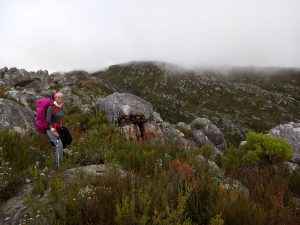
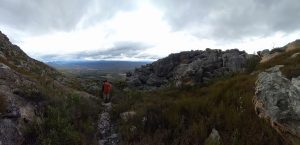
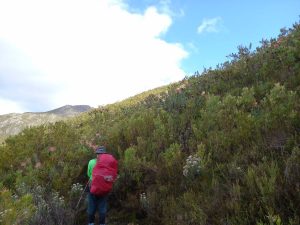
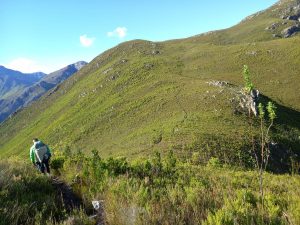
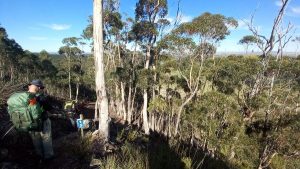
Day 1 is made up of either uphills, downhills or flat hills. But never no hills. At the time of publishing this, the path on Day 1 was very overgrown, making the slog even more difficult as you need to move the vegetation away so you can see where you are going. This is made a lot easier if you have a hiking pole. The majority of the first part of the day will be uphill. Zig-zagging across the slopes in order to get you up and over the other side to Boskloof Hut. There is a steep section of downhill in the last 4km of Day 1, with very rocky terrain. Take it slow and make sure that you use your hiking pole to its full potential. The last descent is over once you reach the wooden bridge. At this point you are about 1km from the hut. There is a long uphill for the last 1km of the hike – it’s the last push to the hut, and you will be tired from the day’s walking.
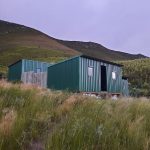
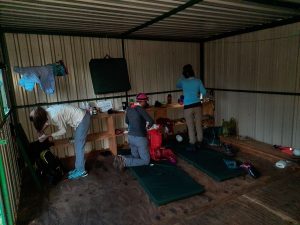
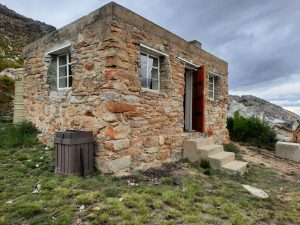
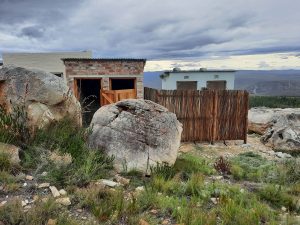
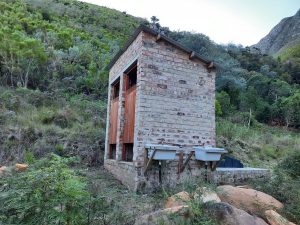
Boskloof Hut is not actually a hut. It comprises of 2 metal structures that have wooden floors. Each structure has shelving space inside, for cooking and unpacking if you need to, with thickish fold-out mattresses for sleeping. There is 1 eco-toilet and no shower. The water supply is from a nearby river (about 20m from the huts). The water is clean and fresh (and cold!). Each hut sleeps 5 people. There are no refuse bins at this hut so please take your rubbish with you and dispose of it at the end of Day 2, in the bins provided.
DAY 2: BOSKLOOF HUT TO GOEDGELOOF HUT (± 11.0km; ± 6 HOURS)
The total distance for Day 2 is 11.0km, which should take about 6 hours to complete. If you leave by 08h30, you will have ample time to reach the hut by mid-afternoon.
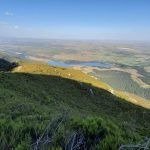
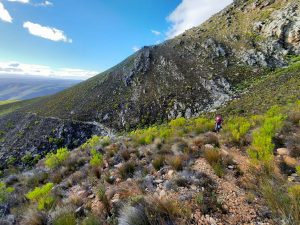
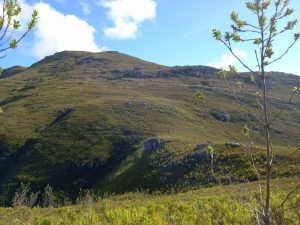
It starts with a 1km uphill climb that zig-zags through the fynbos along the slopes opposite the Boskloof huts. At the time of publishing, the path was extremely overgrown, so take care when walking, as there are some rocks along the path that you can’t easily see, and they are easy to trip over. The path levels out after about 1.5km but then climbs again, taking you up and over the northern slopes of the mountain, to an altitude of 1158m. At this point, the path appears to split. Keep right (look for the large rock cairns), and follow the path and cairns downwards, after which, the path levels out again and is more clearly visible. Shortly thereafter, you will cover a series of flat, zig-zag and slightly sloped sections of the trail, and after walking about 7km, you should reach the highest altitude for the day (1315m).
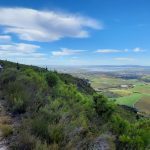
You will then begin the final descent for the day, and the Goedgeloof Huts will soon become visible, along with some beautiful farms in the distance. Don’t be fooled by the huts’ seemingly close proximity. From this point, it is still nearly 4km to the huts, and the terrain is fairly slow-going as it is very rocky. The trail also traverses up and down the slope, so it often feels like you will never get there. You will need strong knees for this section. Also a hiking pole. And probably a good sense of humour.
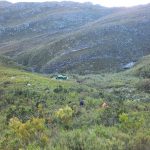
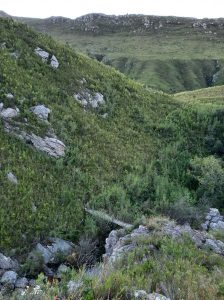
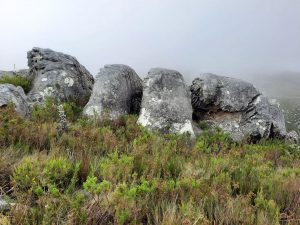
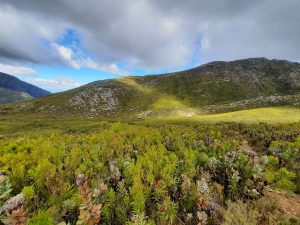
There are a few water spots along the trail on Day 2, but these are mainly along the second half of the day. Make sure you fill up at the large water points, as the undulating downhill to the hut seems endless and there may not be much water in that section during the dry seasons. The scenery on this side of the mountain is quite different from Day 1. The rock formations are beautiful, intricate, and fascinating. During periods of rain, you may find secret waterfalls, and underground streams that you can hear but can’t see.
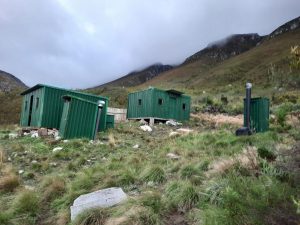
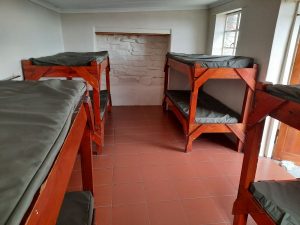
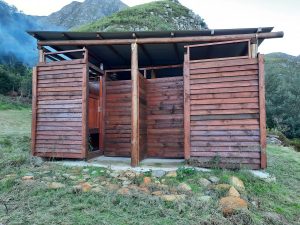
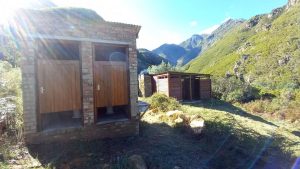
Goedgeloof comprises of 2 separate stone huts – one with 2 bunk beds (sleeps 4) and the other with 4 bunk beds (sleeps 8). All the beds have mattresses. There is also a newly built kitchen and lapa area between the two stone huts, along with a washing line, 2 cold showers, and 2 eco-toilets. The lapa has ample seating space, and also a large countertop for food preparation. The toilets do not have doors, so within your group, you will need to work out a strategy for how to know when they are occupied (at the time of publication, there was a piece of wire attached to the fence next to the right-side toilet which we placed across the entrance-way when the toiled was being used, but the left side was just open for anyone to walk in).


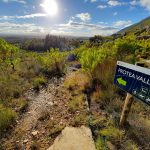
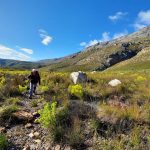
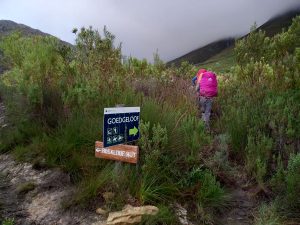
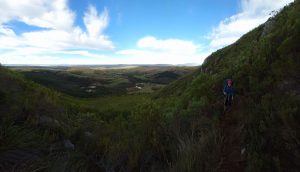
DAY 3: GOEDGELOOF HUT TO PROTEAVALLEI HUT (± 9.5km; ± 4 hours)
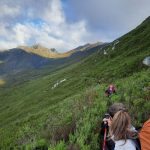
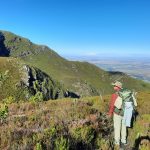
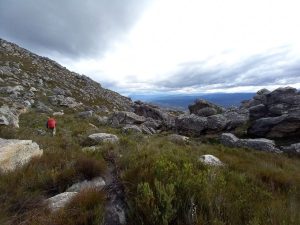
Day 3 is an easier day of walking than Days 1 and 2, and, according to our hiking group, definitely the most beautiful. The first 3km are relatively easy-going, so you will manage to hike this section quite quickly. The path does meander uphill, but the incline is gradual, so it’s a great way to warm up your legs. You need the warmup for the monster hill that awaits.
There is a water point just after the 3km mark, so if you need to fill up, do it here. We recommend also taking a short break here because directly after this point is a long (±1.5km) steep uphill section that seems to be never-ending. Luckily this is the main ascent of the day, so once you have conquered it, the path ahead is relatively easy.
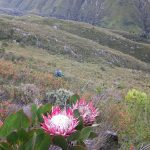
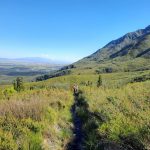
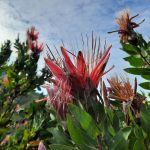
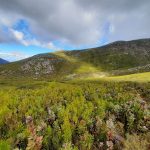
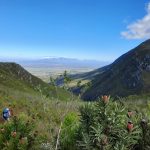
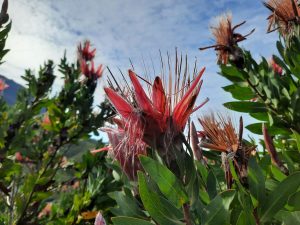
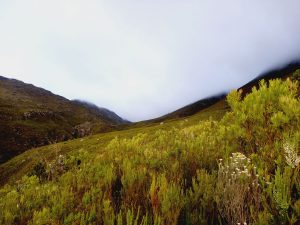
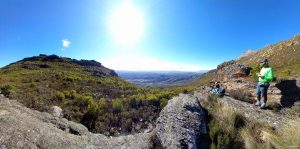
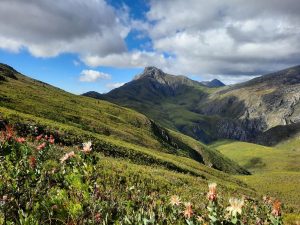
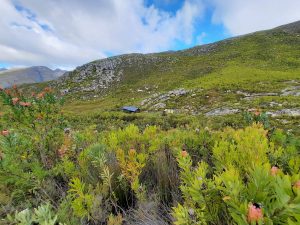
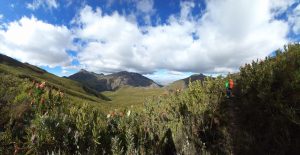
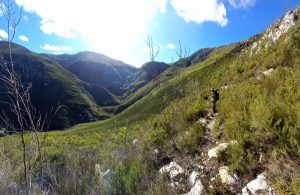
Take a break at the top of the hill, out of the wind, on the rocky section just to the left of the path. There is about 5km of the trail still left to hike from this point to the hut, but it is through the most beautiful section of tall proteas everywhere you look (it’s not called Protea Valley for nothing). Our group walked fairly slowly through this section, not because the terrain is difficult, but because there are simply so many proteas to photograph. Notice, we didn’t say too many…
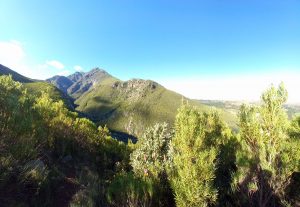
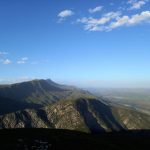
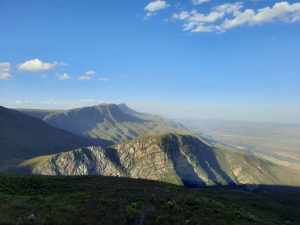
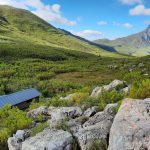
You will be able to see the hut from a fair distance away. As you walk along the meandering trail towards the hut, be sure to turn around and have a look at Misty Point in the distance. It is the highest peak in the Langeberg range and often has beautiful cloud formations around the summit. We each took turns describing what we saw in the clouds. The vastness of the valley of proteas, with this towering peak in the background, is certainly something to behold.
The trail markers on Day 3 are fairly accurate, and the path is wide and open for most of the day, so it is definitely an easier day of walking. You can leave Goedgeloof by 08:30/09:00 and you should reach Proteavallei hut by 13:00, with still enough time to bathe in the river, wash clothes if needed, and play a game or two of cards (which we forgot to bring with us). We didn’t have lunch on the trail on Day 3, but instead, pushed on to the hut and ate there.
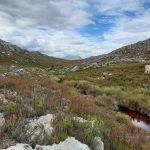
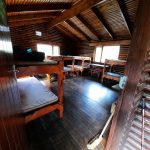
Proteavallei hut is one wooden structure, with 2 rooms and a balcony. There are enough bunk beds that each person can get a bottom for sleeping and a top for unpacking. There are several countertop spaces inside the rooms that are useful for cooking, as well as benches for sitting on. There are 2 eco-toilets a short walk from the hut, There are no showers here (but there are several river pools just a short walk from the two eco-toilets), and no refuse bins so please take your refuse with you.
There are no fires permitted at this hut. There is also no cell phone reception. It is the most remote hut of all along the 5-day route.

DAY 4: PROTEAVALLEI HUT TO WOLFKLOOF HUT (± 7.5km; ± 4.5 hours)
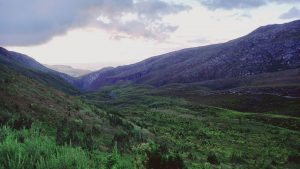
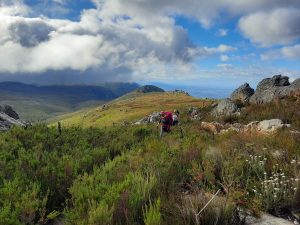
Day 4 is another short day, but comprises mainly of one long downhill that can be tricky underfoot as sections of the trail are overgrown, and in wet conditions, the trail is very slippery. The scenery on this day is vast and majestic. We were lucky enough to see a series of waterfalls on the mountain as we descended towards Wolfkloof Hut. Although short in distance, the day still takes a good 4 to 5 hours to complete. If you leave by 09h00, you should be at the next hut by early afternoon.
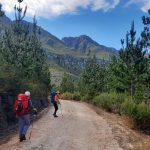
Day 4 starts with a short (1.3km) uphill (this seems to be the norm for this trail), after which, the trail meanders down the mountain and then you will begin the descent along Kruispad for the remainder of the day. It has some very steep sections, but also some flatter sections, so enjoy a break along the route at these points if you need to.
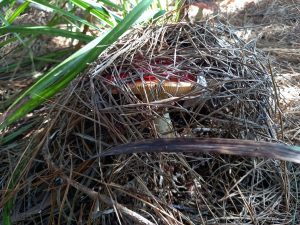
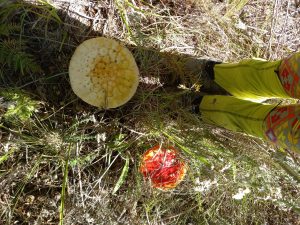
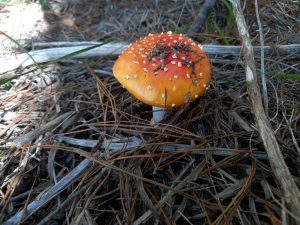
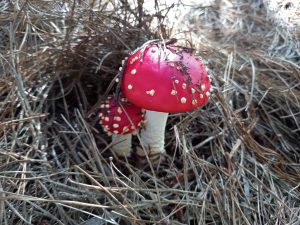
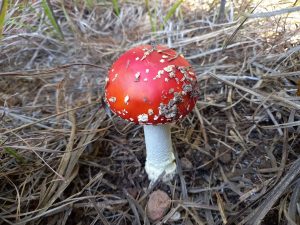
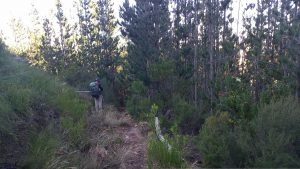
In the last kilometre before reaching the hut, you will walk along the side of a pine forest before making your way down the steep path to Wolfkloof hut. We saw some amazing mushrooms in this forest, which we photographed but did not touch (just in case). The path down to Wolfkloof Hut is a series of large, high steps. Wolfkloof hut is very close to civilisation, so you may be able to hear tractors ploughing or cars driving nearby. It is a sad reminder that the hike is nearing the end.
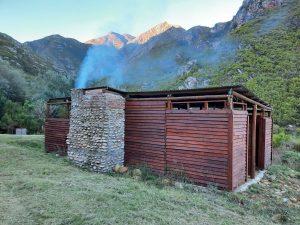
At the time of publication, we were able to phone ahead to William, the farmer who owns the property located next to Wolfkloof hut, to arrange firewood for the evening (Henry from Marloth Nature Reserve will give you his number at the briefing). This is the only hut where fires are permitted and there is a large designated fireplace/braai area to use, in the lapa area. It has a large braai grid as well, but you may want to bring along a pair of braai tongs or a hiking braai grid if you do decide to braai anything. At the time of publishing, the firewood was R50 per bag (for a large grain sack of wood). You won’t need more than 2 bags for a pre-/during- and post-braai fire for a group of 10. You can pay with cash or SnapScan. Just remember to take firelighters with you on the hike for this day.
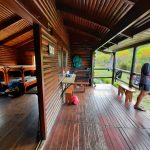
Wolfkloof hut has 2 large cold-water showers and 2 eco-toilets. The setup is similar to Proteavallei in that there are 2 sleeping rooms with numerous bunk beds, and a balcony with a picnic bench. The large lapa is equipped with picnic benches and a basin with a tap. There are several refuse bins at this camp for you to discard any rubbish collected over Days 3 and 4.
A few things to take note of on Day 4:
- You will only get cell phone reception after walking about 1km from Proteavallei Hut onto the next day’s route.
- You are no longer able to opt for the route over Vensterbank, there is only 1 route on this day, and it will take you down Kruispad.
- For safety sake, do not touch, pick or eat the mushrooms in the pine forest
- There are day hikes in the area near Wolfkloof hut, so don’t bathe in the river in your birthday suit unless you want to be ogled by the locals (this happened to 2 of our group…)
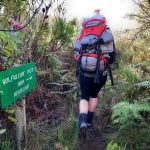

DAY 5: WOLFKLOOF HUT TO MARLOTH NATURE RESERVE OFFICE (± 12km; ± 5 HOURS)
Day 5 starts with a river crossing. Depending on how much rain the area has had in the preceding days, you may need to take off your boots for this one. The river is very close to the hut, so you can evaluate it in the morning before you set off. We left at 08h00, to give us enough time to enjoy the last day, and still travel back to George and Cape Town without getting home too late.
After the river crossing, the trail zig-zags uphill (how surprising!) for about 2.5km. The trail markers for Day 5 are relatively accurate so you can use them as a rough guide. There is a short section of contour path before more zig-zagging for a further 2km. It was quite windy when we hiked Day 5, and we found that some of the areas along the contour path are quite exposed, so make sure you have your warm clothing close at hand.
At the 4.5km mark, there is a lovely spot near a stream to stop for a snack break. Shortly thereafter, the path descends steeply, and you will enter a forest area, and walk along a jeep track. It is quite shaded, and the walking is not particularly tough.
At the 7km mark, you should cross a causeway that leads into the Hermitage Forest. There is a shaded forest area with lots of rocks to sit on and have lunch. The river is wide and you can fill up your supplies here before tackling the last few kilometres of the day.
The trail zig-zags uphill yet again, before descending into a blue-gum forest. After 8.5km, you will reach another jeep track that has a few sneaky inclines. It’s the trail’s way of reminding you that the hike is not over until you are back at your car. This entire section of the hike is mostly well shaded and the smells in the forest after a long period of rain are something to experience.
There are a few smaller roads, paths, and day hike routes, but keep following the signs that read ‘Office’ and you will eventually be led back into the main admin area of the park where you can take your ‘After’ selfie at the Swellendam Hiking Trail Start sign.
There are showers at the end of the hike for those who don’t want to drive back home in a closed space without cleaning themselves first. We chose to jump in our little car unwashed and to head back to George where Nina was waiting for us.
It took us 6 hours to hike the 12km for Day 5, but that included many photography and snack breaks as well as a long lunch break under a forest canopy. You could do it in 5 hours if you don’t stop as much as we did, but why rush.

THE NITTY GRITTY
We tackled the Swellendam Hiking Trail between 14 and 18 May 2021, just after Marloth Nature Reserve was reopened to visitors following some serious floods in the area the week before. Here is a detailed account of each day.
DAY 1: MARLOTH NATURE RESERVE OFFICE TO BOSKLOOF HUT
(± 15.7 km, ± 7 hours)
We began the first day of the Swellendam Hiking Trail on Friday 14 May 2021. We arrived at Marloth Nature Reserve at about 08h00, although the reserve does open at 07h30. Shortly after our arrival and after completing the now routine Covid-19 screening and check-in process, we received a briefing on what to expect on the trail by the Duty Manager, Mr Henry Van Tonder. In short, Henry informed us that the reserve had received 120mm of rain in the past week or so and the reserve had only recently been re-opened to hikers. Henry warned us that the first day was very tough and that we should pace ourselves. If you remember nothing else from Henry’s briefing, then it would have been a worthwhile exercise. Henry explained that the shelters on the first day (Boskloof) had no water, showers or refuse bins, but that there was a mountain stream nearby. No fires were allowed at this overnight shelter, or any of the other huts except for the last hut on Day 4 (Wolfkloof). All of the overnight huts had at least one eco-toilet, better known as a ‘long drop’. The overnight hut on Day 2 (Goedgeloof) had all the usual amenities, except that the showers were cold. Again at the overnight hut on Day 3 (Protea Valley) there were no showers or refuse bins, but there was a tap located in front of the hut. The hut on Day 4 (Wolfkloof), according to Henry, had all of the amenities and it was the only hut where hikers were allowed to make a fire.
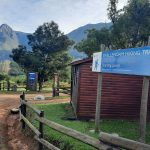
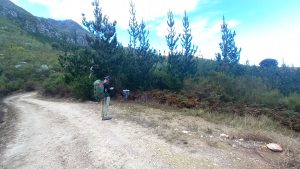
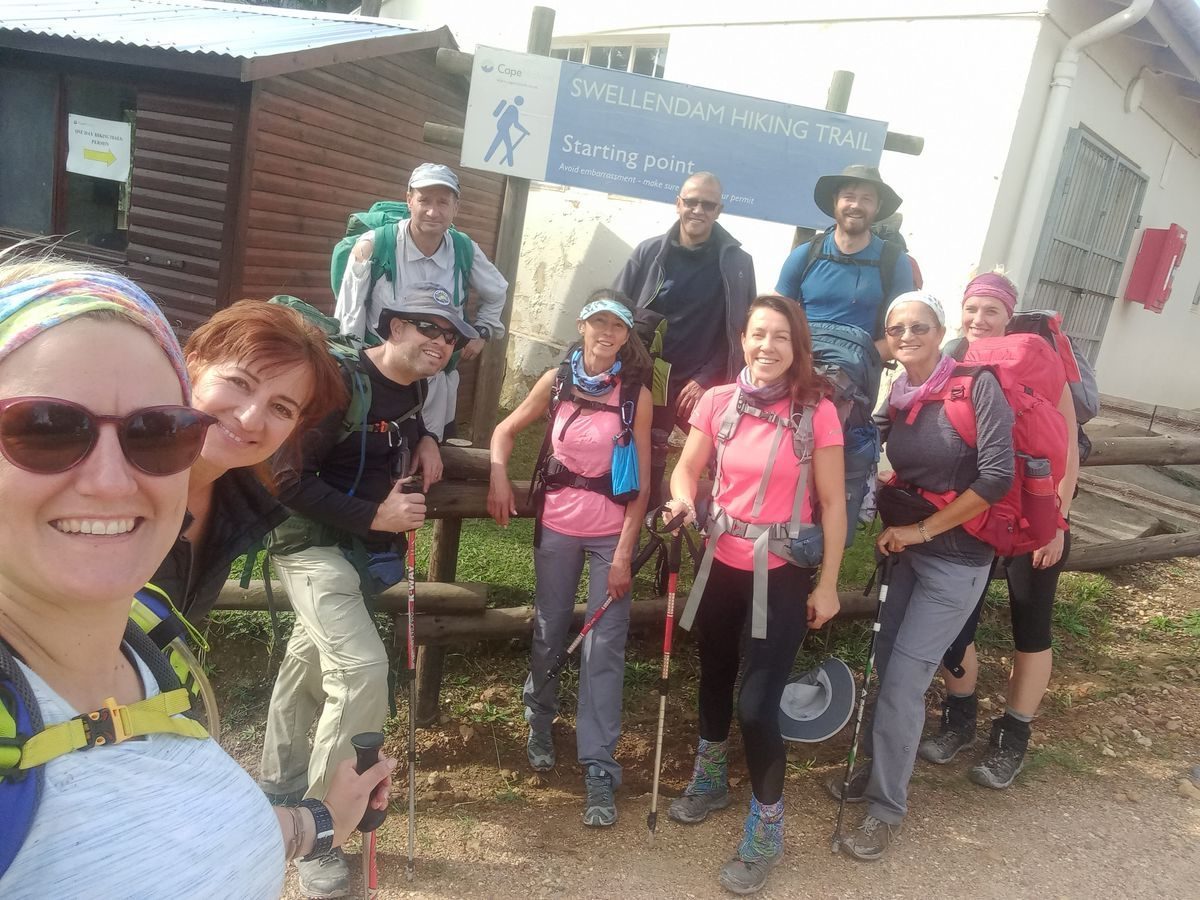
Whilst getting ready to begin our 5-day journey along the slopes of the Swellendam mountains, Henry offered us the opportunity to start Day 1 from the Duiwelsbos parking area (you will read about this option in other blog posts as well). It would mean that we could drive down to Duilwelsbos, drop off our bags and 8 of our hiking party and return to the office, where Henry would drop the two drivers back at Duiwelsbos. This would cut down the total distance for Day 1 by almost 3km. We opted to hike the full distance from the office (plus it’s the only place to take your ‘starting selfie’ with the trailhead in the background).
After parking our vehicles inside the secure fenced-in section of the reserve, we all walked over to the start of the trail, where the obligatory ‘before’ photo was taken. Only one of us had done the hike before (and it was quite some time back), while the rest of us were left to mull over the comments made by Henry during the briefing, “Day 1 is very tough, you must pace yourselves!”. We have heard these words used before for other hikes, but they were never more appropriate for this hike. Ignore this advice, at your peril!
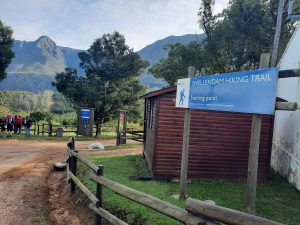
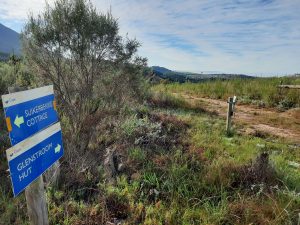

At about 09h00 (but you should aim for no later than 08h15/08h30 if you can), from the Swellendam Hiking Trail trailhead, we began our journey along the gravel road through the wooden pole archway for about 165m, turned right at the sign for Glenstroom Hut and immediately left at the trail marker, which was a pair of white-painted shoeprints. You will see a lot of these shoeprints on the first day of hiking. They mysteriously disappear for most of the rest of the hike and reappear suddenly towards the end of Day 5.
After hiking about 1 km, we reached a jeep track, turned right and crossed a mountain stream, turned left and followed the jeep track and the “SHT” signs. (After the many uphills on Day 1, we thought they had perhaps accidentally left out a letter on these signs…)
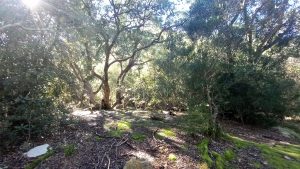
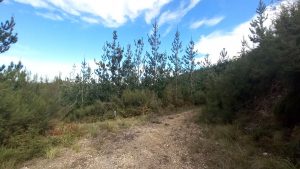
We followed a zigzag (switchback) path down to a waterfall through a field of proteas. Depending on which season you choose to do this hike, you will see a large variety of flowering fynbos along the route. The proteas are spectacular. It all makes for beautiful photography and something pretty to distract you when you are traversing yet another uphill.
We soon reached a cement causeway and on turning left, arrived at the grassed parking area of Duiwelsbos. It had taken us just under an hour to cover the 2.85km from the office to Duiwelsbos. We had dropped about 50 metres in elevation and the conditions underfoot were very slippery.
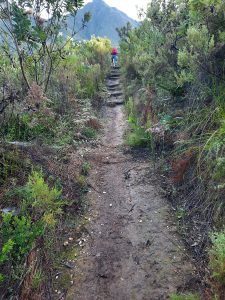
After a brief stop to catch our breath and to collect our thoughts, we started a steep climb from the parking area onto a zigzag path that had long straight but steep sections, following the signs for the Boskloof hut. We do love how so many hiking trails have the signs for the hut right near the beginning of the trail. It gives you a false sense that the hut can’t be ‘too far away’…
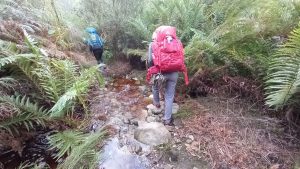
At around 11h00, after hiking approximately 4.6km, we crossed over a mountain stream reaching an elevation of 481m. The trail then turned right and followed an undulating contour path along the southern slopes of the Swellendam mountains. Up until that point, we had been following a relatively straight trajectory in line with the office. About 1km later, we crossed over another mountain stream layered with several small waterfalls. We had hiked about 5.8km at that point and had climbed to an elevation of 565m. We continued on and moved through a section of cool forest, crossed over two more mountain streams before the trail began to zigzag down the slope stripping away about 110m of elevation we had just gained.

We stopped to have lunch at a mountain stream at about 13h30 after racking up a trail distance of 8.4km. After enjoying several slices of melba toast with peanut butter and jam with a side of mung beans (we were testing out a new menu on this hike…), we headed off again at about 14:15. One member of our hiking group was really struggling at that point so we decided to stay with her while the rest of the hiking party forged ahead. This person is an experienced hiker and is no stranger to tough hiking conditions. However, as a result of the lack of exercise due to limits placed on hikers regarding participation in multi-day hikes in large groups over the past year, mixed with the extraordinarily tough challenge of the Swellendam mountains, she was not enjoying herself. It meant that we had to slow our pace down to be able to cope with the long ups and downs of the first day. Belinda is slow on the uphills anyway, so was quite relieved to be walking a little slower. A lesson to be learned here, or an important reminder to other hiking groups, is that you never leave a struggling hiker behind and expect that he or she will make their own way to the overnight hut. The three of us stuck together and this hiker was given additional snacks to keep up her energy levels. We knew at that stage already that we would only reach the overnight hut after dark and notified the rest of the group via WhatsApp so that they were aware of our slower progress.
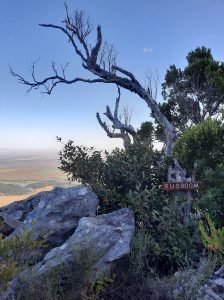
After climbing again along a zigzag path, we reached one of the landmarks along the trail called ‘Rusboom’ at about 15h15, after hiking about 10km. We continued past ‘Rusboom’ and ascended along a zigzag path that turned back toward Swellendam. As we approached the apex of this mountain, the trail swung towards the right and took us over onto the northern slope at about 16h30 (11.9km).
We continued to ascend along the northern slope and crossed another mountain stream at a distance of 13.3km. We should mention at this point that there are what looks like ceramic distance markers along the trail, but these are not accurate on Day 1. At times, we noted that they indicated up to 1.2km less than the actual distance covered.
While climbing the northern slope and just before we reached the apex, another one of our hiking party returned along the route after reaching the hut, and took the backpack of the hiker who was almost completely out of energy. The hiker who had returned to help told us that we still had 4km to go to the hut which seemed so far away, but it meant that the total hiking distance for the day was around 15.7km and not the 17.5km advertised. We took comfort in that as the sun was starting to set and the temperature was starting to drop.
At about 17h50 (14.3km), we crossed a wooden bridge. At that point, a second hiker from our group returned to see if we needed any help. We were still okay and he returned to the hut empty-handed. Before leaving, he took a photo of the three of us. Our spirits were much improved at that point as we knew the hut was just over the next hill. The conditions from the bridge became more difficult as the path seemed to be made of clay and the steeper the trail became, the more we struggled to keep ourselves from slipping.

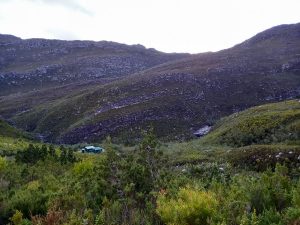
We finally reached a signpost indicating the trail to the Boskloof hut went off to the left and the trail for Day 2 ran off to the right. We could still not see the Boskloof shelter, but it appeared out of the darkness approximately 130m after the signpost, much to our relief and the cheers from the rest of our hiking party.
Although it took us roughly 9.5 hours to complete Day 1, you should bargain on around 7 hours. The rest of our group completed it in 7 hours, whilst walking at a manageable pace, with frequent rest and photo stops. We ended up walking in the dark for a short while, but this can be avoided by starting the hike slightly earlier than we did.
BOSKLOOF SHELTERS
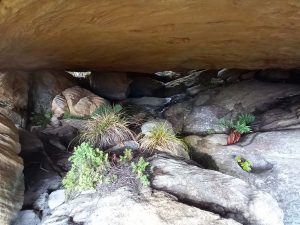
The two Boskloof shelters are constructed of metal sheeting and have a raised wooden floor. The top shelter has insulated walls while the shelter lower down does not. We ended up sleeping in the lower shelter, which to our surprise, stayed relatively warm throughout a very cold night. There are two eco-toilets situated next to the shelters, but only one is open for use by hikers. There is a mountain stream that borders on the shelters and is accessible by the occupants of both shelters via a short path. Access to the stream from the top shelter is via a path above the shelter and via a path just below the lower shelter. Once we had greeted everyone and laid down our heavy packs, we took all our fillable containers (water bladders, kettle and bottles) and filled them up at the river by torch-light so that we didn’t have to brave the cold again, and we had enough water for supper and breakfast.
There are no rubbish bins at this shelter and no showers. No fires are permitted at these shelters due to the high risk it poses for veld fires.


HIKING STATS
The hiking statistics that were generated by our Garmin GPS (GPSMAP 64S) are listed as follows:
| Total Distance | 15.7 km |
| Total Time | 09h25m |
| Moving Time | 06h27m |
| Stopped Time | 02h57m |
| Max Speed | 5.5 km/h |
| Moving Average | 2.4 km/h |
| Overall Average | 1.7 km/h |
Have a look at the Relive video to see the route for Day 1.
DAY 2: BOSKLOOF HUT TO GOEDGELOOF HUT
(± 11.0km; ± 6 HOURS)

After a quick breakfast of chia seeds soaked overnight in coconut milk, sprinkled with freeze-dried banana chunks (also part of our new menu… we think we will keep this one), along with a cup of slightly sweet tea, we headed off on Day 2 of the trail. The altitude at the overnight shelter was about 940m. We left at 08h00, as we needed to wait for the last of the morning rain to abate. The rest of the group (the faster walkers) left at 08h30. We walked back along the 130m path we had come in on the night before and then turned left, leaving Day 1 behind us and forging onto the next stage of the hike. It had poured with rain during the night, so we expected wet conditions underfoot for a second day running.
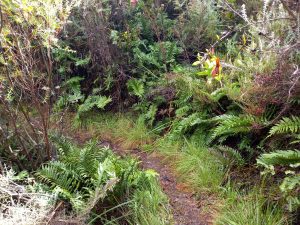
We climbed an overgrown zigzag path from the shelter for about 1 km before the trail morphed into a relatively level contour path. We soon spotted the colourful splash covers on the backpacks of the rest of our hiking group in the distance behind us. Unfortunately, the theme of overgrown paths continued throughout the day and at some point, it felt like we were ‘bundu bashing’ just to stay on the path. Hopefully CapeNature will be sending in their trail maintenance crew sooner rather than later to clear the trail. With the trail already waterlogged in places, it didn’t help that we also couldn’t see where we were walking. There were also rocks along the path, so we had to be careful not to trip over them as we navigated the overgrown trail.
We crossed a small mountain stream before reaching the end of the contour path, after covering a distance of about 2.5km. At that stage, we had reached an elevation of 1107m, a touch higher than the highest peak on Table Mountain. After a short break, we began to ascend the zigzag path which took us about 20 minutes to hike up and over onto the northern slopes of the mountain (1158m). We reached this altitude at about 09h20. The path at the top is not clearly visible but just look out for a rock cairn on the right that will indicate the path to follow. There is also a viable-looking path that leads away to the left. Do not take that path. There are several other rock cairns as you descend on the other side that will ensure that you stay on the correct path.
We continued to descend for a short while before it appeared that we were crossing a plateau. Before long, we started to ascend again and reached a river crossing at about 10h25 (elevation 1262m). We enjoyed a 20-minute respite at the river, whilst watching the various cloud formations overhead. Rain was expected for later in the day and we really wanted to ensure we reached the hut before the heavens opened. After our break, we headed off to the right and gently ascended the southern slope of the mountain looming ahead of us. After climbing a relatively short zigzag path, we reached the top of this mountain boasting a respectable altitude of 1310m. As soon as you reach the top of this section of the mountain, the trail over the next mountain is mapped out ahead of you on the opposite slope. Look out for the rock cairns in this section, they will keep you on the right track. As far as official trail markings are concerned, they all but disappeared on this section of the trail.

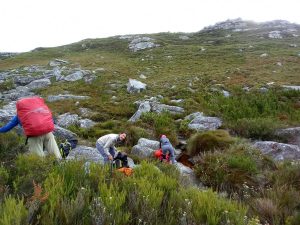
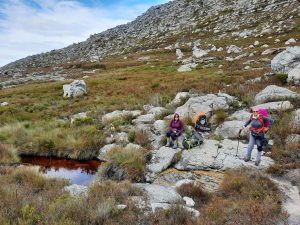
We began our descent over a mountain stream and continued down the other side. A long river came into view cutting a deep groove into the landscape between the opposing slopes. The trail then turned towards the left and we continued on the southern side of the river for quite some distance. At about 12h15, we crossed over this river after hiking a distance of 6.6km (elevation 1247m). We took a short break there and prepared ourselves for the climb ahead of us. While resting, we received an uncomfortable reminder of the cold weather conditions at that altitude. An icy cold wind cut through our layers of clothing as our bodies began to lose the heat generated through constant movement along the trail. We realised that if one of us were to sustain an injury at this altitude, we would need very warm clothing and a makeshift shelter to prevent the rapid onset of hyperthermia.
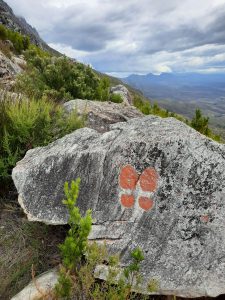
After heading off again, we crossed another mountain river and began climbing the southern slope. 15 minutes later (12h50), after a hiking distance of 7.2km, we were at the top of the highest peak of the day, registering an impressive 1315m on the GPS. There was a rocky overhang with a #PErocks painted rock nestled in the strata. We pocketed it and have hidden it in a secret location on another local hiking trail… At that point, only 3.8km remained of the day’s hiking.
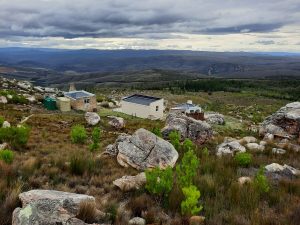
Shortly after beginning our descent, we spotted the Goedgeloof overnight huts off in the distance, just above a farm dam. It did not look that far away, but it would take us another two and a half hours to reach it. The path in the last section of the trail is set out in such a way that it twists and turns every which way in much the same way that a toddler moves its head this way and that to avoid a spoonful of peas from its mother. Coupled with the difficult trail surface comprising of thousands of loose rocks, the last stage of this hike slows your progress down to a crawl. The beautiful rock formations make up for the agonizing realisation that if you had designed this trail, you would have made the route go in a straight line to the hut. One of the highlights along this section was a hollowed-out rock with a small mountain stream flowing through the middle of it. This rock is located at a distance of 8.5km (elevation 1127m). The other highlight is Knapsack Falls which is set back from the trail on the northern slope of the mountain. It can be seen on the left side of the trail at around the 10.3km mark.

We reached Goedgeloof Hut at about 15h15 (although the first couple had arrived about an hour before that) and we were grateful to be able to enjoy a quick shower, despite the freezing conditions. The altitude at the overnight hut was about 805m. Not long after we stowed our backpacks inside the hut, the predicted rain began to fall. We made it just in time to arrive warm and dry. The weatherman had predicted 60mm of rainfall between Saturday night and Sunday morning, so once we felt the first few drops, we knew it was there to stay for a while. Four of our hiking party were not as fortunate and had to endure nearly two hours of persistent precipitation before reaching the hut. We had some hot tea brewing for them on their arrival.
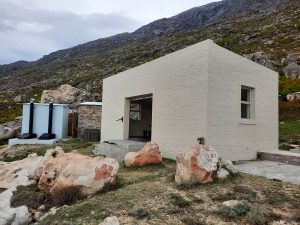
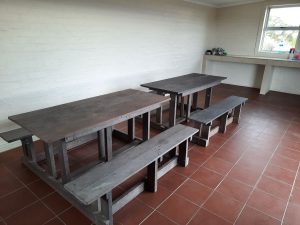
Those of us who had reached the hut, before the rain, had congregated inside the lapa/kitchen that is fitted with a steel roller door. While it was functional inside and had enough countertop space and seating area, the outward appearance of the structure was not in keeping with a traditional overnight hiking camp. It felt more like a single garage than something one would expect to find on the side of a remote mountain slope. But it was functional and warm and allowed us all to gather as we cooked and discussed the days’ walking.
After enjoying a hot dinner comprised of instant mashed potato mixed with dried mushrooms, bacon slices and freeze-dried vegetables (it’s a quick and easy meal, with no actual boiling required, so you save on gas), we called it a night and were in bed just after 20h00. The rain was still falling thick and fast outside. Our night’s rest was rudely interrupted twice by a leak in the roof of the hut, but a rearrangement of the bunks and a well-placed bucket and camping kettle allowed us to continue our sleep until the next morning. We have been assured that leaks in the roof of the hut will be repaired by CapeNature, as soon as possible, and that the materials for the roof repairs have already been procured.
GOEDGELOOF OVERNIGHT HUT
This overnight hiking camp comprises of 2 stone huts that can accommodate 8 and 4 hikers respectively (all on bunk beds, so choose your bunk-partner wisely). There are 2 cold showers with wooden half doors and two eco-toilets without any doors. This proved to be difficult when we went to the toilet whilst it was raining, because after you dropped your pants and sat down to complete the necessary business, you were subjected to a full onslaught from sideways rain coming in through the open doorway. There also isn’t an easy way to tell if someone is using the toilet (especially the one on the left), so make sure to shout ‘is anybody in here?’ before accidentally walking in on someone. Some things can’t be unseen!
Outside the lapa/kitchen is a tap for filling up water and washing dishes. It was very handy during the rain, as the other taps and basins are a distance away and we would have been soaked otherwise. There are plenty of refuse bins around the camp so remember to get rid of your refuse or you will be forced to carry it with you until the end of Day 4. If you are lucky enough to reach this hut on a sunny day, and you need to wash any clothing, there is a large basin at each of the eco-toilets, along with a washing line just behind the lapa. We recommend bringing along a few pegs in case it is windy.

HIKING STATS
The hiking statistics that were generated by my Garmin GPS (GPSMAP 64S) for Day 2 are listed as follows:
| Total Distance | 11.0 km |
| Total Time | 07h30m |
| Moving Time | 04h52 |
| Stopped Time | 02h38 |
| Max Speed | 4.2 km/h |
| Moving Average | 2.3 km/h |
| Overall Average | 1.5 km/h |
Have a look at the Relive video to see the route for Day 2.
DAY 3: GOEDGELOOF HUT TO PROTEAVALLEI HUT
(± 9.5km; ± 4 hours)

After breakfast (the same chia seed-coconut mix as the morning before, but this time with freeze-dried blueberries) we headed off on Day 3 of the trail. We looked forward to a slightly shorter day of walking than the previous two days – especially since Day 3 is advertised as an ‘easy’ day. It is. Sort of.
The sunrise over the farmlands below the hut was beautiful. Before heading out, a rainbow made a brief appearance behind the huts. It symbolised the promise of God that the world would never again be consumed by a flood. After all the rain we had been having, we all needed reassurance that the promise made all those years ago hadn’t changed. The rain had stopped, and we all felt the better for it.

The start of the trail for Day 3 begins below the lowest stone hut and is signposted as ‘Protea Valley’. The trail gently descends along the northern slopes and the going is easy underfoot. The ceramic distance markers for Day 3 are much more accurate with an error margin of less than 200 metres. It had been drizzling in the morning, so we left later than planned (at about 08:50) but we knew we had a shorter day, so would still make it to the hut with plenty of afternoon to spare.
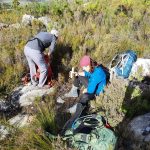
We crossed over three small mountain streams before the trail began to climb gradually up the mountain slope, along an undulating contour path. At 09h50 and after walking for about 3.1km, we reached a waterfall from Warmwaterrivier that cut across the trail (740m). It is marked as ‘Waterpoint’ on the map. After relaxing for a moment and taking a minute to enjoy Knapsack Falls flowing at full capacity in the distance, we crossed the river and began the steep zigzagged climb on the other side of the waterfall. This climb is up towards Warmwaternek. Had we known this climb was going to be quite so steep, we would perhaps have spent a little more time at the falls. This climb carried on and on and on, with each turn revealing another stretch of uphill until we finally reached the top in just under an hour. The entire hill is about 1.5km and by the time you reach the top, you will have completed a total of 4.5km. The altitude on top was a respectable 1052m. A handy tip for when you reach the top of this hill is not to walk until the very top where you are exposed to the strong and cold mountain wind. But, rather to look to your left near the top and rest awhile on the rocks bathed in full sunlight and protected from the prevailing wind. We rested there for about 50 minutes and waited for all 10 hikers to conquer the hill, had some snacks, and enjoyed the sunshine.
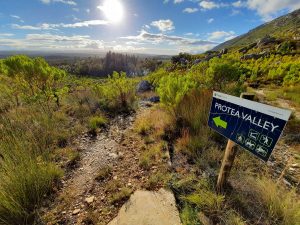

At about 11h30, we set off again and descended into the most beautiful valley of proteas any of us had ever seen. The proteas trees were in excess of 2 metres tall and were covered in proteas as far as the eye could see. Understandably, this was the number one highlight for most of the hikers for the entire 5-day trail. Again, a cold mountain wind whipped at our coattails as we moved through the red sea of colour. This was also the first time that the Proteavallei overnight hut came into view.
After nearly 30 minutes of following a relatively level contour path (5.8 km), we began a gentle climb towards the hut. The trail was overgrown and waterlogged in sections. Two Cape Sugarbirds chased each other from protea to protea and chirped their greetings to the party of 10 passing through their floral kingdom. We crossed a small mountain stream at 12h50, before completing a short descent to the Proteavallei hut. We arrived at the hut at 13h10, after covering a total distance of 9.5km. The altitude at this hut was 985m. We were some of the first to arrive at the hut. The rest of the group trickled in over the next 45 minutes. Their extra time on the trail allowed for some amazing photographs to be taken.

We made the most of an early arrival at the hut and the sunny weather. We decided to wash our clothes, swing dry them. and then hang them up on two makeshift washing lines that we tied between the trees and the hut. It was a team effort, but once up, the line was long enough to accommodate everyone’s laundry. There are no permanent washing lines at this hut.
Just remember to bring a pack of cards or some good conversation with you for days like this. Or lots of snacks. The afternoon can be very long if you get to the hut too early. An afternoon siesta is always a good idea. We all sat on the balcony at the hut, ate our lunch, and then as the sun dipped behind the mountain, we made tea, sat in our matching sleeping bags (KWay Chamonix for the win!), and as our usual end to a great day on the mountain, we laughed and laughed and laughed. We are honestly so lucky to have such an amazing group of friends to share these experiences with.


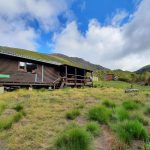
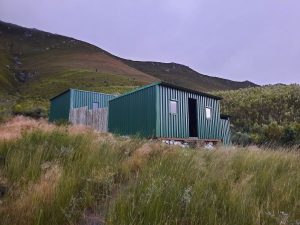
PROTEA VALLEY OVERNIGHT HUT
This overnight hiking camp comprises of a traditional wooden hikers’ hut that is split into two sleeping sections; one with 6 double bunk beds and the other with 4 double bunk beds – once again, enough space for each person to have a bottom bunk to sleep on, and a top bunk for unpacking. The hut is also equipped with single benches and countertops for cooking purposes. The traditional deck in front of the hut was a welcome sight after a day out on the trail. The most endearing characteristics of the Proteavallei hut are also its greatest weaknesses. This is the last of the original hiking huts on the trail and it is beginning to show its age. The floorboards have gaps in them and some of the windows have slipped out of their frames. This makes it the coldest hut on the trail to sleep in.
There are two eco-toilets in the camp, marked Male and Female, as well as a tap and cement basin just in front of the hut. There is a stream that runs just above the hut and can be used for bathing purposes. There are no showers at this hut and no refuse bins. Again no fires are permitted here. There is also no viable cell phone reception at this hut and it is the most remote of all the huts if a medivac is required.


HIKING STATS
The hiking statistics that were generated by our Garmin GPS (GPSMAP 64S) are listed as follows:
| Total Distance | 9.5 km |
| Total Time | 04h30m |
| Moving Time | 03h05m |
| Stopped Time | 01h25m |
| Max Speed | 4.9 km/h |
| Moving Average | 3.1 km/h |
| Overall Average | 2.1 km/h |
Have a look at the Relive video to see the route for Day 3.
DAY 4: PROTEAVALLEI HUT TO WOLFKLOOF HUT
(± 7.5km; ± 4.5 hours)

Our night at Protea Valley hut was a cold one. We wore all our warm clothes, including gloves, beanie, buff and down jacket, but the air was frigid, which resulted in a restless night’s sleep. But, nothing a warm cup of tea couldn’t fix. After the usual scrumptious breakfast and taking down our washing line (which had been moved later to inside the hut), we headed off on the trail for Day 4. There used to be two trail options for Day 4. Hikers could either go over Vensterbank or choose to follow Kruispad. However nowadays, the Vensterbank route is not open and hikers can only opt for the Kruispad route to get them to the Wolfkloof overnight hut. The route is very clear though, so there is little chance of going off-track. We left the hut at 08h45 and headed back toward the stream we had crossed the previous day, but turned right just before reaching the stream. After walking about 400 metres along a waterlogged path, the trail began to ascend along a zigzag path. Our usual morning ascent had begun. At about 09:15 and approximately 980m along the trail, we managed to find cellphone signal again.
It is important to remember that if you experience an emergency of any kind whilst overnighting at Proteavallei Hut, you will need to walk along the trail for Day 4 for about a kilometre before you will be able to make or receive any calls or send or receive any social media messages.
We climbed to the top of this first hill at about 10h00 after covering a distance 1.3km, reaching an altitude of 1168m. After a brief stop, we slowly and carefully descended further along the Kruispad route. We were all mindful of the warning given by Henry during the briefing about how slippery the descent along the Kruispad is.
After hiking 1km from the top of the hill, the descent levelled off (1022m). The trail then began to climb again almost immediately and it took us about 10 minutes to reach the top of that section of the contour path (1067m). At that point, the trail ran inside the bed of a narrow mountain stream which made descending along it tricky, to say the least. Hiking poles and shoes with good grip are definitely needed for this section, even in dry weather. We made it through and clocked up a distance of 2.8km during which we walked past an impressive waterfall to our right. From the 3km mark, the trail became overgrown and difficult to navigate, adding to the technical nature of the trail.

We descended along a zigzag path which took us past the 4.5km ceramic trail marker. We decided to stop and rest there and enjoyed some tasty trail snacks (829m). We began walking again at about 12h15 and hiked for another 40 minutes before reaching a signpost for Wolfkloof Hut (498m), covering a total distance of 6.2km.
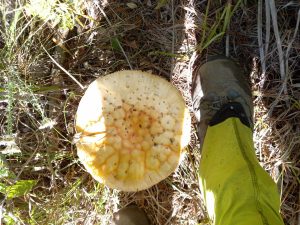
In the last kilometre before reaching Wolfkloof Hut, we walked along the side of a large pine forest. It was a welcome scenery change from the usual fynbos that we had seen for the previous few days. There were several very large and interesting-looking mushrooms growing along the forest floor, so some of the group took a break there to capture photos of these fascinating fungi. None of us had a degree in Mycology, however we know from previous hikes that some of these mushrooms may be poisonous. So please don’t touch them (or pick them, or eat them). They were an amazing array of colours, shapes and sizes, with some just peeking through the carpet of pine-needles that had been dropped on the forest floor.
We continued to descend, with the route becoming a series of large, steep steps, as Wolfkloof Hut came into view. We reached the hut at 13h30 after completing a total distance of 7.6km. There are some very steep downhills during the latter half of the day, so don’t be surprised if your legs feel a little like jelly by the time you get to the hut.
It was still quite sunny on our arrival so most of us showered so that we could stay warm before the sun dipped behind the mountain. Two of our hiking party decided they preferred the river pools for bathing but didn’t realise that the local farming community uses the access path just above the river. Needless to say, it was a rather awkward encounter when they realised that it was not just the 2 of them enjoying the view.
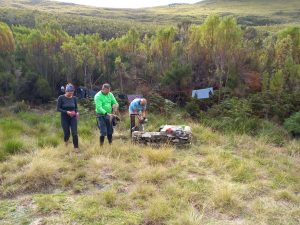
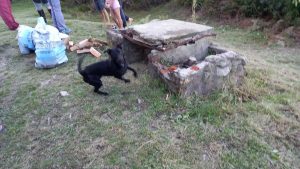
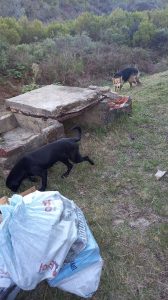
Once we were all clean, warm and ready for that next cup of tea, we heard a commotion across the river. Our firewood had arrived – along with William’s wife and 3 small children, all carrying several pieces of firewood. Sipho (possibly the strongest farmhand in the history of the world) was ambling along carrying 2 HUGE bags of wood on his own. They all made it safely across the river (more on that in Day 5’s section) and delivered their precious cargo. It was strange to see ‘other humans’ after a few days away from the hum-drum of the regular world.
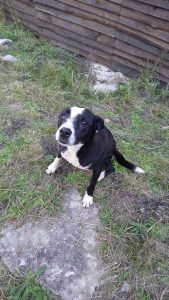
Possibly only a smidgen better than being clean and dry, with a raging fire on the go, was the fact that William’s 3 dogs, who had joined the wood-carrying brigade, decided to spend a bit of time with us at the hut. Those of us missing our furry companions back home really enjoyed their company. It is possible that they were just sticking around in the hopes of getting a snack.
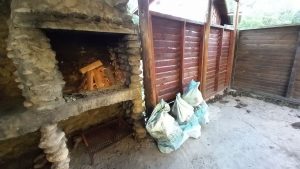
After a braai dinner (remember to only bring vacuum-sealed meat along for such a long hike), we settled down to some warm beverages around the fire. It was a cold night, so the fire was a welcome source of warmth. We had ordered 3 bags of wood, but we definitely overcatered. For a group of 10 hikers, with a pre-, during- and post-braai fire, you will only need 2 bags of wood. They are enormous.
We reminisced on the past few days together, as well as swopping the usual hiking stories, and sharing lots and lots of laughter. We are a funny group, what can we say. We went to bed with full tummies, happy hearts, but with an element of sadness knowing that the next day would be our last day on the mountain together.
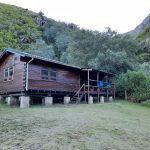
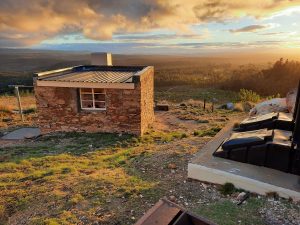
WOLFKLOOF OVERNIGHT HUT
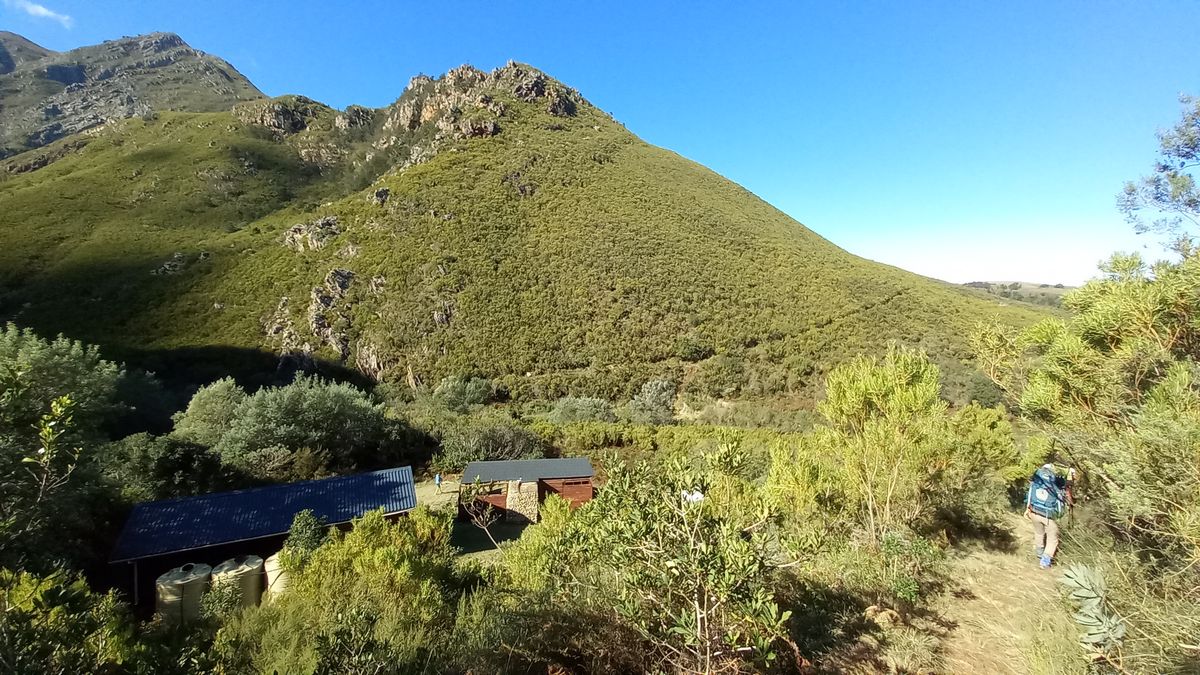
This overnight hiking camp was by far the most impressive of all the overnight camps. Wolfkloof Hut has a similar layout to Protea Valley Hut – It has a traditional hiking hut which is split into two sleeping sections, with a balcony adjoining the two. The camp also boasts a large lapa with an undercover braai facility, two 6-seater picnic benches, and a basin with a tap for food preparation. There are also two cold-water showers adjoining the lapa. There are two eco-toilets in the camp and plenty of refuse bins to go around. This overnight camp provides a fitting end to 4 tough days on the trail and is perfectly equipped to usher in the final day on the mountains.

HIKING STATS
The hiking statistics that were generated by our Garmin GPS (GPSMAP 64S) are listed as follows:
| Total Distance | 7.6 km |
| Total Time | 04h50m |
| Moving Time | 02h53m |
| Stopped Time | 01h57m |
| Max Speed | 4.9 km/h |
| Moving Average | 2.6 km/h |
| Overall Average | 1.6 km/h |
Have a look at the Relive video to see the route for Day 4.
DAY 5: WOLFKLOOF HUT TO MARLOTH NATURE RESERVE OFFICE
(± 12.0km; ± 5 HOURS)

The best advice that we can give to fellow hikers for the last day of the Swellendam Hiking Trail is to treat it like any other day on the trail and not think of it as an easy walk out of the mountains. Day 5 is a full day’s hike and should not be taken lightly. There is every reason to make the most of your last day in the mountains before re-joining life in the fast lane. We left the hut at 08h00 so that we could enjoy a leisurely day, but still have enough time to travel back home without arriving really late, as some people had work the next day.
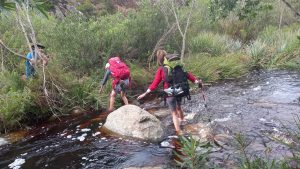
After a hearty breakfast and a cup of tea, we started the final day of the Swellendam Hiking Trail by crossing over a strongly flowing river. This is the same river the Firewood Brigade had passed over the night before. Six of the party decided to try their luck and boulder hop over, while the remaining four took off their boots and waded through the river. We made a couple of short video clips to show the various options of how to cross this river safely. It’s only about 50m from the hut so you can evaluate the water level in the morning before setting off.


After we all made it safely across, we followed the trail as it climbed steeply along a zigzag path. At about 08h50, we reached a small plateau (450m) and took the opportunity to have a short break, after hiking a distance of 1.58 km. The trail then turned to the right and continued to climb. The ceramic trail markers for Day 5 were reasonably accurate with a margin of error of less than 350 metres.
At about 09h30, after hiking just on 2.5km, we reached the top of the first climb at 553m and continued along an undulating contour path that descended toward a mountain stream. We crossed the stream and climbed again on the other side. We reached another stream at the 4.5km trail marker and took the opportunity to enjoy some fresh, ice-cold mountain water and a few snacks. After a 25 minute respite, we packed up and headed off again. After hiking past the 5km trail marker, the trail descended rapidly and after about 30 minutes we entered a pine forest (5.8km). The trail later opened up into a wide jeep track that peeled off to the left. There were plenty of mushrooms growing on either side of the track which drew a lot of interest from certain members of our hiking party.
At about 11h35, we reached a flooded cement causeway and crossed over into Hermitage Forest after hiking a distance of 6.9km (196m elevation). We followed the jeep track for another 5 minutes and reached the point where the trail left the jeep track on the right and climbed up further into the forest (7.0km). We found a magical clearing in the forest just between the river and the jeep track, where we sat down and enjoyed an early lunch. There is really no place like it on the whole 5-day trail and we were lucky to stumble across it.
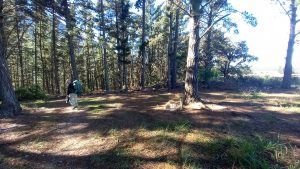


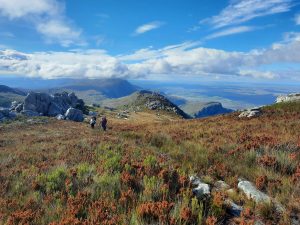
After relaxing in this clearing for about an hour, we hauled our full tummies up the zigzag path into the forest. It was a reminder to rather conquer the hills before eating a big lunch. We took about 30 mins to reach the top of the climb before the trail descended into a blue gum forest. About 5 minutes later, the path turned left onto a jeep track (8.6km) which headed off toward the office and the end of the trail. The jeep track had a few testing hills up its sleeve, which just reminded us that although we were out of the woods (literally), the hike was far from over.
We continued to follow the signs for the Office and walked past two large farm dams along the way. The trail gave its last hoorah in the form of a final uphill slog before the jeep track swung right and led us back to the Swellendam Hiking Trail Start sign. So ended the 55.8km 5-Day Swellendam Hiking Trail. It was so great to be back on the mountain!

HIKING STATS
Unfortunately, our Garmin GPS (GPSMAP 64S) indicated a low battery during the latter part of the day’s hike and whilst trying to rectify the problem, we must have screwed up the track data recorded for Day 5. The only stats we could determine for the last day were as follows:
| Total Distance | 12.0 km |
| Total Time | 6h03m |
Have a look at the Relive video to see the route for Day 5.
We would definitely recommend this hike if you are looking for a challenging 5-Day route that is not too far to travel to if you live anywhere in the Western Cape.
