Arangieskop Hiking Trail, Robertson
[contact-form][contact-field label=”Name” type=”name” required=”true” /][contact-field label=”Email” type=”email” required=”true” /][contact-field label=”Website” type=”url” /][contact-field label=”Message” type=”textarea” /][/contact-form]
Our First High Altitude Adventure

UPDATED – 16 AUGUST 2019
The Arangieskop Hiking Trail is located in the Dassieshoek Nature Reserve in the small Western Cape town of Robertson. Robertson has a population of around 27 000 people and is widely known for its wine and roses. It is about a 2 hours drive from Cape Town along the R60, via Worcester. For more information on the town itself, you can contact Robertson Tourism on (023)626 4437 or 081 580 9868 or you can email them on [email protected]
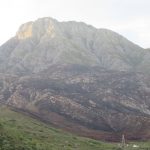
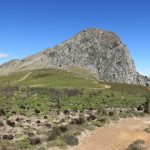
With a maximum altitude of about 1696 m, Arangieskop qualifies to be classified as a high altitude mountain peak. While not the highest peak in South Africa, nor even in the Western Cape, it has still earned the reputation of being the ‘Mount Kilimanjaro’ or sometimes even the ‘Mount Everest’ of the Western Cape. I have not climbed either of these two peaks so I am not in a position to say whether that description is accurate or not.
Blog Post Updated
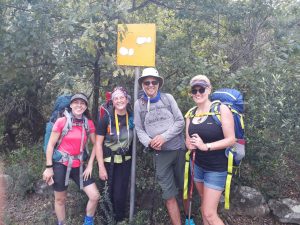
We first hiked Arangieskop on 11 & 12 August 2017. We hiked it again on 3 & 4 March 2018 and most recently on 21 & 22 March 2019. We have included a few new photos as the weather was much better the second time and brilliant the third time around. We were a large group of 11 on the second hike, and 5 on the third occasion, instead of 3 the first time around.
The only difference that we noticed during the second hike was that the condition of the trail had deteriorated on Day 2. A large section of the path once you enter the forest section was overgrown which made life a little bit more difficult to follow the path and negotiate your way through it. Thankfully during the third hike in March 2019, much of the trail had been cut back and remarked. Thanks to the Langeberg Municipality for doing that much needed trail maintenance. There was however, one section just before the last river crossing where the trail was narrow, overgrown and there was a large degree of soil erosion, causing certain parts of the trail to be quite dangerous. We urge all hikers to be extremely vigilant, especially if there has been any rainfall (even slight) prior to their hike, as that section can become wet and slippery.
How to book:
Trail bookings can made made through the Langeberg Municipal offices in Ashton.
Tel: 023 615 8086
Fax: 023 615 1563
E-mail: [email protected]
They only do bookings via email. You will need to finalise payment one week prior to your hike start date. Once you have emailed the Proof of Payment to the booking office, you will be issued with a hiking permit, information leaflet and a map of the trail.
Booking Fees: [Valid until 30 June 2020]
| Dassieshoek Cottage* | R203 per adult |
| Arangieskop Hut (Protea Farm) | R 132.50 per adult |
| Hiking Permit | R 63 per adult |
| Hiking Badge* | R76 |
| *Optional (Not always available) |
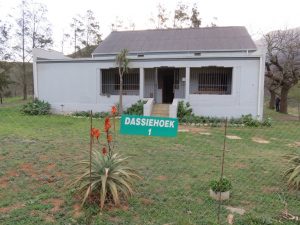
If you choose to stay at the Dassiehoek 1 Cottage the night before you hike, you will receive the combination to the safe mounted to the wall at the front gate of the hut. The keys for the hut are locked inside, along with a copy of the permit, other documentation, and badges if you have ordered them.
You don’t have to stay overnight there. If you are coming from Cape Town, you can leave early in the morning, drive to Robertson and then start hiking on the same day.
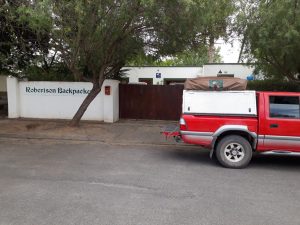
On the third occasion of doing this hike, we chose to travel through to Robertson the night before the hike and stay at the Robertson Boutique Backpackers. We thoroughly enjoyed our stay there. It is perfectly set up for a small group of hikers preparing to tackle the mighty Arangieskop. You can find out more about the accommodation facilities that they offer by visiting their website here. Their dormitory room is cheaper than the Dassieshoek cottage, and the facilities are much better. We will definitely be staying there again in future.


How to get there:
TO GET TO DASSIESHOEK COTTAGE:
From Cape Town, travel along the N1 highway until you get to Worcester, via the Huguenot tunnel. Don’t forget the toll fees for the tunnel. Take the Robertson turnoff on the N1 highway to the right and follow the directional boards to Robertson through Worcester via the R60.
Once you enter Robertson, turn left into Paul Kruger Street (just before KFC) then left into Paddy Street. Drive over a few speed bumps until you get to a dirt road. Follow the dirt road, through a mountain pass, until you get to the Dassiehoek 1 overnight hut on your left hand side. The condition of the dirt road is good and you will easily be able to get there in a normal sedan vehicle.
Click here for the Google Maps location.
You are advised to arrive at the Dassiehoek 1 hut by 18h00 on the evening prior to the start of your hike. I suspect that they do not want you to travel on the dirt road in the dark.
TO GET TO ROBERTSON BOUTIQUE BACKPACKERS:
Once you enter Robertson, turn left into Paul Kruger Street (just before KFC). Travel all the way up until you reach Waterkant Street where you must turn right, then directly left into Dordrecht Ave. Click here for the Google Maps location.
The Speedy Review (tl;dr)
This hike encapsulates so many amazing things in one short weekend getaway. It has uphills, downhills, tricky terrain, scrambling, beautiful scenery and most importantly, the view from the top of Arangieskop is absolutely breathtaking. The overnight hut on Day 1 is quaint, well-equipped and so welcoming after a long hike up the mountain. Make sure you book early if you want to go on a weekend, because it is a popular route. If you are able to take off a Friday or Monday, it will be easier to get a booking. Also remember that they only accommodate 20 hikers per night at the huts. Watch your step, especially in wet weather, as it is easy to lose your footing and slip.
Here is the packing list we used for this hike.

Trail Ninometer
![]()
Nina rated this trail 0/5 paw prints, because there are no dogs allowed on the Arangieskop hike. She did, however, have a great weekend being looked after by a pet sitter. She was very excited to see us when we got home.
The Nitty Gritty
Day 0
We left Cape Town (Bellville) on Thursday 10 August 2017 at about 15h20 and arrived at Dassieshoek 1 hut at about 17h20. It was a road distance of 142 km. On climbing out of the bakkie, we got our first glimpse of Arangieskop. As we stood next to each other and looked up at the formidable mountain towering over us, we each had a private conversation with ourselves as to what possessed us to agree to climb Arangieskop. No one got back into the bakkie, which was a good sign!
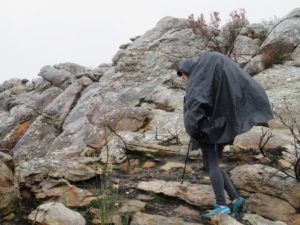
The weather was not great with cold conditions and rain forecast for both days of the hike. The weather forecast for Friday (11th) was 3⁰C / 16⁰C with a 50% chance of rain and Saturday was going to be 4⁰C/ 16⁰C with a 6% chance of rain.
We were originally supposed to be a hiking party of 8, but due to various issues including non-availability and injury, 5 of our hiking party could not make it. The 3 remaining members of the party, Belinda, myself and a fellow member of the SAPSTAP (Police) Hiking Club, Roderick, had never done this hike before, but were counting on the other party of 8 booked for the same day, to kind of show us where to go.
Soon after arriving at Dassiehoek 1, we took a drive down to Dassiehoek 2 situated about 700 m further down the dirt road to meet the other group and to get some more information. Unbeknownst to us, for some or other reason (possibly the bad weather), the entire party of 8 had cancelled.
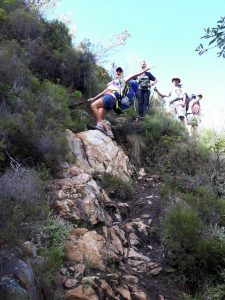
The Start of the Arangieskop Hiking Trail
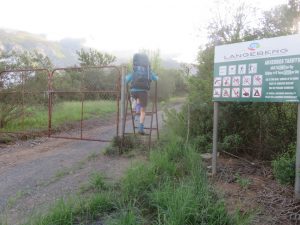
The Arangieskop Hiking Trail starts at the entrance gate to the Dassieshoek Nature Reserve. Once you have gone through these gates you need to follow the dirt road until you reach a fork in the road. Take the left fork and continue on.
Turn left at the sign below and cross over a metal girder bridge.

Follow the road as it curves to the right until you see the trail markings, two white shoe prints, pointing off to the left.
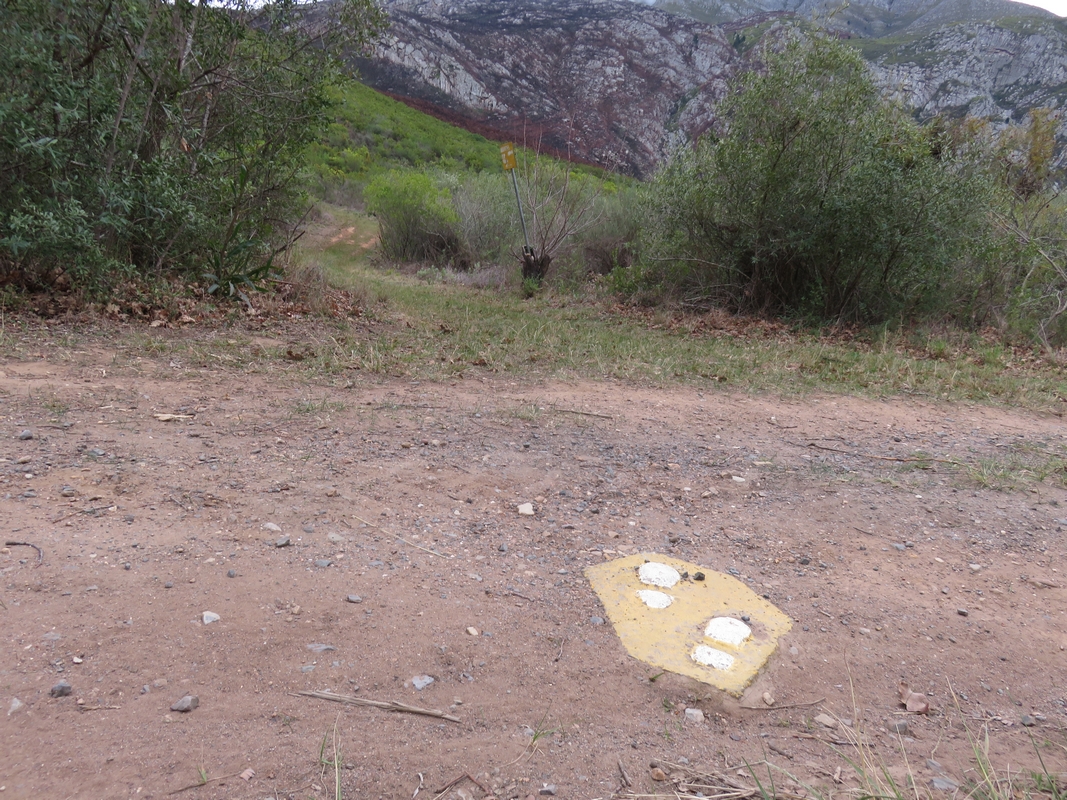
Shortly after turning left, you will come to this sign.

The route up is marked with white shoe prints on a yellow background and the route down is marked by yellow shoe prints on a white background.
When you receive your hiking permit from the Langeberg municipality, you will also get a map of the Arangieskop hiking trail. Just take note that the newer overnight hut now called Dassiehoek 1 is labelled as Blaauw hoogte Overnight Hut on the map. The hut referred to on the map as Dassieshoek Overnight Hut is now called Dassiehoek 2. Dassiehoek 2 is located at the entrance to Dassieshoek Nature Reserve.
Here is a little information on the first overnight hut that you may want to know.
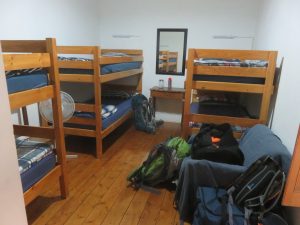
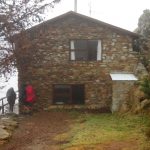
Dassiehoek Hut 1
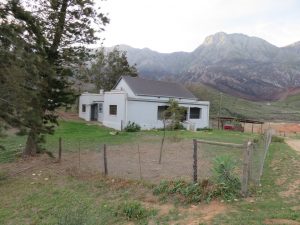
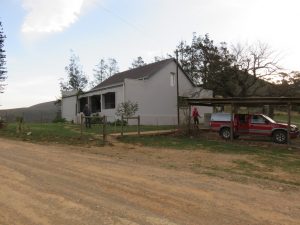

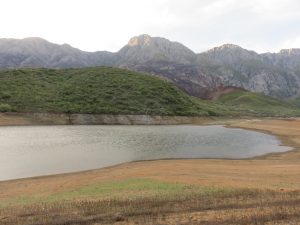
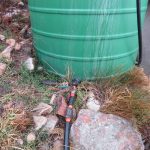
This hut is the newer of the two huts on offer. It looks like it was an old farm house before. Overall, it is in a reasonably good condition however there were a few things that needed attention which I will go into further detail later on in this post. It is located next to the Dassieshoek Dam, which like most of the dams in Cape Town in 2017, was nearly empty. This has thankfully improved of late.
There is electricity at this hut with lighting and plugs points so that you can charge or run your various electronic devices.
There are 6 separate sleeping rooms with single and double bunks that can accommodate 30 people. The municipality has however restricted the daily number of hikers that can hike the route to a maximum of 20 persons.
There is a large room with a table that can used as a briefing room with a landline installed.
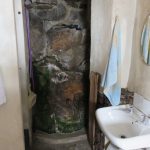
The kitchen has a stove and a fridge and an indoor fireplace / braai. There are two full bathrooms. One has a bath and the other has a shower. There are two outdoor braais located near the car ports.


Shortcomings of Dassiehoek 1 Hut
Far from me to moan about the amenities of an overnight hut, but I do feel that there are things that are missing from this hut, or that need to be repaired, that can improve the overall experience. Firstly there are no utensils, cutlery, crockery, glasses, pots or pans in the kitchen. This includes braai (barbecue) tongs. The cupboards have nothing in them.
There are also no mirrors in the house. Not that I need to be reminded of what I look like, but a mirror is useful, especially in the early morning.
The chimney of the indoor fire place/braai does not draw the smoke up and out the house. When you have a fire going, the house quickly fills up with smoke so if you want to use it remember to open quite a few windows before hand. On a cold windy day that can make the house feel like a fridge. Unfortunately, we had to use it because the weather was not conducive to making a fire and braaing outside.
There is no wood at this hut, but you are warned of this before your arrival so that you can stop in Robertson on your way in and buy some wood at a local shop.
There is only one drain plug which fortunately fits both the bath and the kitchen sink. There was a window pane missing from one of the windows in the bathroom with the shower, which in our case, with the bad weather, turned it into an outdoor shower. However on our quick ‘inspection’ visit to this cottage on 21 March 2019, we noticed from the outside, that the bathroom window had been repaired.
The outdoor braai facilities are located on the far side of the house. They do not have benches near them and I found their location in relation to the house, impractical. There is also a beehive in one of the trees next to the braai area so be careful if you are allergic to bee stings.
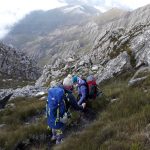
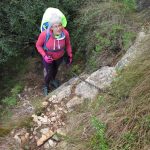
Day 1
The 3 of us started the hike from Dassiehoek 1, at about 08h35, a little later than we normally start our hikes. We made sure that it was light enough to see where we were going as none of us had done this hike before. We left our car parked inside the gates of the Dassieshoek 1 premises. You don’t have to do this, and instead can drive down to the start and park in the Nature Reserve, but it is very quiet and secluded there and is not advised. Another option is to pre-book the shuttle from the Tourism Information centre in town and leave your car there. There is, however, ample space to park at Dassieshoek 1 without your vehicle getting in the way of the other hikers. Before we left, we had a local come and see us off. This little dog followed us all the way to the gates of the Nature Reserve and as if on queue, it turned around and trotted off. Thank you for the escort little guy.


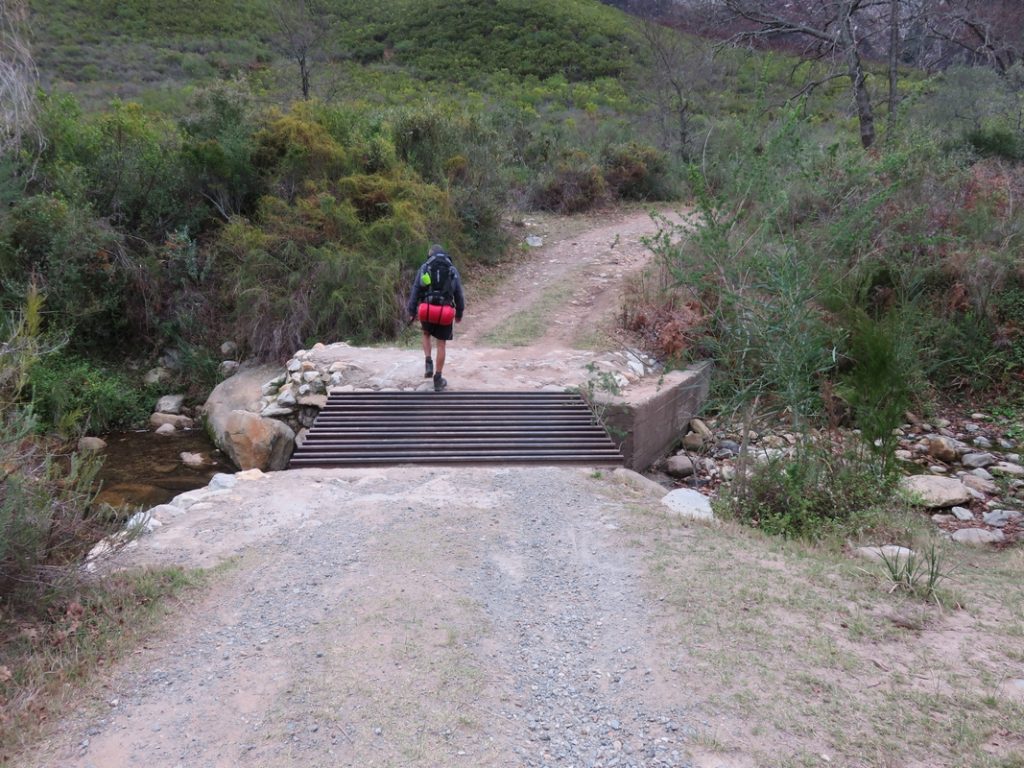
We walked through the entrance gate to the Dassieshoek Nature Reserve and continued on for another 300 m and turned left at the fork and followed the trail signs over the bridge and up the hill. About 30 minutes into the hike, it began to rain and we had to make a quick pit stop to put on our ponchos.
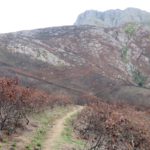
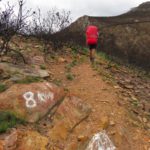
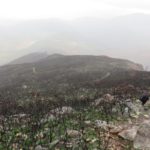
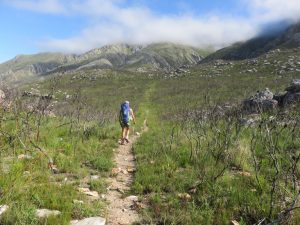
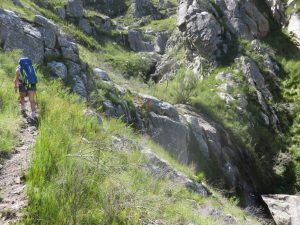
At 09h26, we reached the 8 km distance marker. That indicated that we had 8 km left before we reached the overnight hut. Elevation at that point is 493 m. The lower half of the mountain still showed the effects of a recent fire that destroyed quite a large area of the mountainside during March 2017. The trail zigzagged its way up the left side of Arangieskop. We all found the ascent slightly easier than we had anticipated.
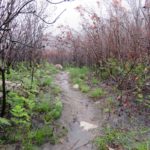
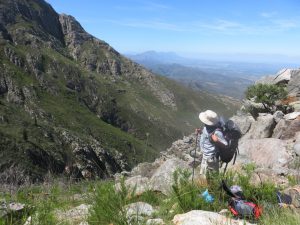
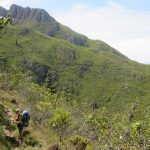
What we did not anticipate was that after we had climbed for 2 hours, and covering a distance of about 4.5 km, we would be descending quickly again into Watervalkloof. We have included some photos from March 2019 here.


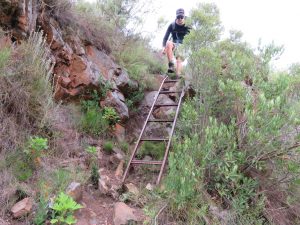
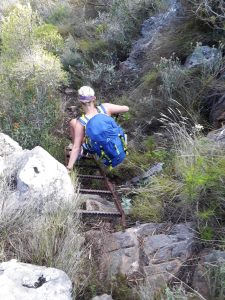
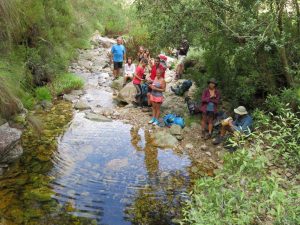
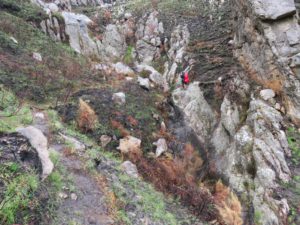
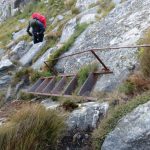
At 11h02, we came to a metal ladder which we had to climb down. That was followed closely by a chain which lowered us down into the path of a mountain stream with crystal clear water [753 m]. That was the perfect spot to have a snack break and to refill water bottles. The blurry spots on the photo above are from the rain which kept on hammering us as we trudged along the trail. There were moments though when the rain let up and we were able to take some nice photos. The trail crossed over the river there and ascended quite steeply on the other side. We continued to do what we could to stay warm and dry and motivated to keep climbing. It just seemed like when you had gained significant altitude, Arangies would take you all the way down again and you would have to start all over again. After another temporary halt in the rain, we were rewarded with a spectacular view of a rainbow.


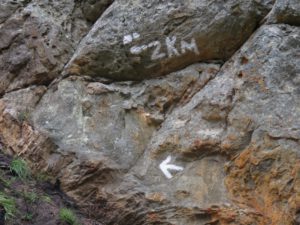
We did not encounter any trail distance markers again after the 8 km mark, until we reached the 2 km mark, at 13h30. Little did we know that the remaining 2 km were the toughest of the first day’s hike. The trail distance covered to that point was 8.4 km with a moving time of 03h06m. The total time on the trail to that point was 05h00m with an altitude of 1239 m.
Be careful when you cross the section just before the 2 km sign. It is very slippery there. Belinda slipped and fell there and was fortunate not to injure herself too badly.
After making the short crossing, the trail turned to the left and ascended passed a small cave.
At 14h12, we crossed a little stream running across the path, where one could fill up a water bottle if necessary. The trail continued to ascend toward the overnight hut. At 14h43, the path intersected with a jeep track and turned right toward the overnight hut. The distance covered to that point was 9.7 km. A few minutes later the jeep track crossed another jeep track. We continued on straight and reached the overnight hut at 14h49 with a total hiking distance of 10.4 km. That included the extra 1 km we walked from Dassiehoek 1 to the start of the trail. The actual total trail distance was 9.4 km.


The Stats for Day 1
The trail markers for Day 1 were a set of white shoe prints on a yellow background. There were also several yellow and white arrows painted on the rocks to show the way. The trail was fairly easy to follow however there were one or two places where we lost the trail and had to backtrack a few meters. This was partly due to the fire damage to the trail and surrounding vegetation.
There were two distance markers on this trail at 8 km and 2 km to go.
The trail for Day 1 had a total walking distance of 9.4 km.
The hiking stats for Day 1 (including the extra 1 km) were:
| Trip Odometer | 10.4 km |
| Total Time | 06h16 |
| Moving Time | 03h53 |
| Moving Average | 2.7 km/h |
| Overall Average | 1.7 km/h |
| Max Speed | 8.1 km/h |
| Elevation Range | 355 m – 1515 m |
The elevation gain for Day 1 was 1235 m.
The hiking stats for Day 1 (including the extra 1 km) that we completed on 3/4 March 2018 in good weather were:
| Trip Odometer | 10.4 km |
| Total Time | 05h52 |
| Moving Time | 02h51 |
| Moving Average | 2.8 km/h |
| Overall Average | 1.8 km/h |
| Max Speed | 9.5 km/h |
| Elevation Range | 355 m – 1515 m |
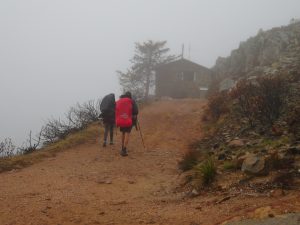
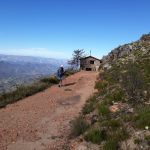
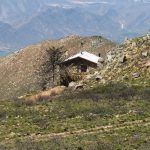
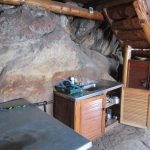
Arangieskop Mountain Hut [1482 m]
I would echo what a lot of hikers before me have said about this hut. It is really something special.
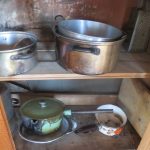
Here is some information about this hut that you may want to know. Unlike Dassiehoek 1, this hut is stocked with many things that you would need at an altitude of 1482m above sea level. It has a kitchen with pots and pans as well as an indoor fire place and plenty of wood. There is also a cupboard that has an array of mismatched cutlery and crockery, however this was locked on the first two occasions we stayed there, but unlocked on the last. It is safer to bring your own cup, plate and cutlery, just in case.
There is electricity at this hut in the form of lighting. There are no electrical plug points though, so you will not be able to charge your electronic devices there. There was fairly good cell phone reception at this hut.


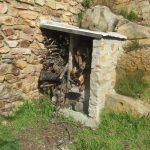
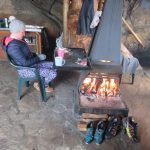

The wood there was dry which was a heaven sent after the constant rain we had to deal with the whole way up the mountain, in 2017.
The facilities outdoors included a braai area with a grass green lawn with a picnic table that you can use to unwind and relax after a long day’s climb, weather permitting.
There is also a ‘donkey’ boiler that is fitted inside the braai on the right hand side. Signs recommend that you use ‘dennehout’ wood for the ‘donkey’ boiler and the other wood for the indoor fire place. Water to the hut is supplied by a green tank just above the hut. The water is usually turned off after each group leaves so you will need to turn it on again at the tank and at a red valve mounted on the external wall of the hut, near the tank.
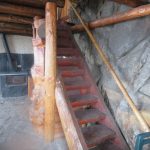
The hut has 3 beds downstairs in the open plan lounge kitchen area with two flushing toilets and 1 urinal. There are 2 showers, one open plan (without a door) and one with a door. There are also 2 basins downstairs. There are also permanent washing lines erected above the indoor fire place to hang your clothes if, like us, you got rained on. By morning all of our wet clothes and shoes were dry.
Up the stairs, there are 3 bedrooms with single bunks. Two of these bedrooms also have twin bunks (double beds) which is great if you are hiking as a couple.
There are a variety of rule notices that have been put up inside the hut. These rules are reasonable and also for you own safety so please read all of them when you get to the hut.
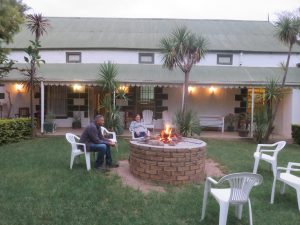
Belinda and I enjoyed a steak and veggie dinner followed by a cup of Horlicks. Roderick enjoyed a sachet of pasta and sauce and a cup of coffee. Belinda and I were both in bed by 20h30 to get enough rest for the early start the next morning. Roderick stayed up a bit longer next to the fire place.
We have included a photo or two of the second and third hike where the weather was glorious and we were able to make the most of the grassed lawn.


Day 2
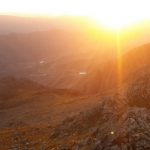
We were all up between 04h30 – 05h00 to get ready to leave the hut by 06h00. That would give us enough time to catch the sunrise at the summit which was predicted to be at 07h23. We had a quick breakfast, packed our backpacks, tidied up the hut and walked out the door around 06h10. The hut thermometer warned us that the outside temperature was 2⁰C. I had my newly acquired spandex leggings on, hiking shorts, together with a beanie, a down type jacket over a fleece top, a long sleeve shirt and a pair of gloves. The icy mountain wind cut through all of these layers and it was only when I started walking that I started to feel warm again. Then, after walking a few hundred meters, I was boiling hot again.
The distance that we needed to cover from the overnight hut to the summit was approximately 1.2 km with an altitude gain of just over 200 m.
I had gone out the previous afternoon to make sure of the route that we would be following to the summit in the dark the next morning. You must walk away from the hut, the same way you came in. When you get to the cement jeep tract you need to turn left and up the hill.
Follow the jeep track up the hill and then turn left into another jeep track marked by a stone standing upright. After you have turned left, you will see a set of yellow shoe prints set in cement on a white background pointing the way ahead. Once again don’t assume that you know where the trail is taking you. Very often Arangies will not take you on the most direct route to where you want to go and that applies to the route from the overnight hut to the summit as well.

At about 06h47, we arrived at the summit a good 35 minutes or so before sunrise. The short summit hike took us around 37 minutes.
Tip: Try to get to the summit about 15 minutes before the sunrise. We arrived too early and got very cold up there waiting for the sun to make an appearance.

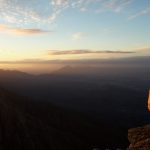
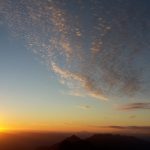
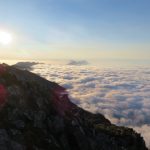
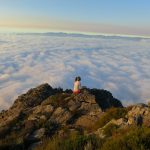
There was an icy cold wind blowing at the top and we had to alternate which hand we held the camera in to avoid losing all feeling in the hand exposed to the elements. At the summit you have a 360⁰ view of the Robertson and the Koo Valley below. Belinda took shelter next to the radio hut and inadvertently eavesdropped on the radio communications of a local security company giving their control room reports on house visits. Not sure if they know that their communications are not private.

Eventually at 07h23, the sun began to show it’s face and we snapped away to out heart’s content, one hand at a time.


On the third occasion that we summited Arangieskop, One of friends, Roderick, decided that it was high time to burst into song. While it didn’t qualify for a ‘Idols’ audition, it did bring a smile to our chattering teeth. If you would like to view to this ‘one hit wonder’ music video, you can do so here.
At about 07h34, we began to descend again and followed the pair of white shoe prints over the back of Arangieskop and down a ladder. It was cold, but it was not icy so it didn’t prove too difficult to get through that section of the trail. As we continued our descent, Roderick pointed to the shadow of Arangieskop being cast on the mountains and valley below us. Very cool image.
As we made our way down, we found that the conditions were becoming more and more difficult. The rocks and path were still wet from the rain the day before and it became very slippery.
At about 08h12, after a few near misses, Belinda lost her footing behind me and fell. As I turned around to find out if she was okay, I saw that she was still sliding and had gone off the edge and was continuing down the side of the mountain. Luckily for the both of us, I was close enough to take a step toward her and grabbed the handle on the top of her backpack and stopped her from sliding any further.
Fortunately she just had some bumps and bruises and a slight alteration to the shape of her trekking pole, but nothing too serious. At that point, we had covered a distance of 2.3 km [Total 12.7 km] with an altitude of 1488 m.
At 08h56, we stopped and had a snack break. The distance covered to that point was 3.0 km [13.4 km] with an altitude of 1304 m.


We continued to our climb down into the ravine and at 09h43, we crossed over a small mountain stream. The distance covered to that point was 3.8 km [Total 14.2 km]. After a distance of 200 m, we crossed another stream.
At 10h04, we crossed a stream for the third time at a distance of 4.2 km [Total 14.6] at an altitude of 1004 m. At 10h08, we reached the 1000 m mark. The spot had been marked with paint by someone on the rock with the date of 29-04-15. There was also a rock on the path that has been swallowed by a tree root as it had grown. Very weird!
After crossing over the river for the third time, we all expected the trail to take us further down the ravine, but it had other plans for us. The path then turned 180⁰ and we headed up an adjoining ravine. At 10h22, we stopped for a short break there to shed all of our warm clothing before climbing further up the ravine. We got going again at 10h30.
There was some scrambling involved to be able to climb over the huge boulders in the ravine. There was even a section where chains had been bolted to the rock to assist hikers to scale the side of the ravine.
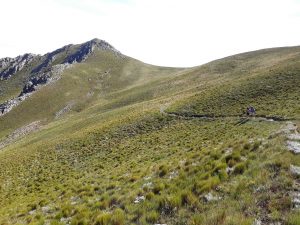
After about 20 minutes (10h50), we managed to climb across and out of the ravine and on to a type of contour path that took us around the other side of the mountain. The distance covered was 4.9 km [Total 15.3 km].The altitude at that point was 1053 m.
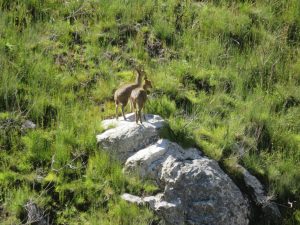
At 11h04, the contour path began to descend into another ravine. The distance covered to that point was 5.4 km [Total 15.8 km] with an altitude of 1016 m. There were two dassies sitting on a ledge watching our progress to the bottom.
At 11h25, we crossed another stream to get to the other side of the ravine. The distance covered was 6.0 km [Total 16.4 km]. Five minutes later, we crossed another stream with very little water in it. The altitude there was 992 m. After we crossed the stream the path took us up and to the left and again in the opposite direction to what we were expecting and on to a contour path with an elevation of 1017 m.
At 12h03, after descending again, we reached the 1000 m mark once again at a distance of 7.0 km [Total 17.4 km]. By this time, the sun was high in the sky and the birds were increasingly vocal as we walked along the trail.
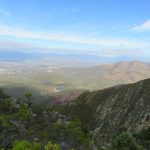


At 12h22, we reached the ‘4 km to go’ mark. The distance covered to that point was 7.6 km [Total 18.0 km] with an altitude of 851 m. At 12h28, we emerged from the bush into a viewing spot where there were clear views of the valley below. The distance covered to that point was 7.8 km [Total 18.2 km] with an altitude of 829 m.
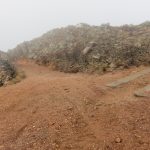
At 12h58, the path joined up with a jeep track and the trail markings indicated that we should turn left there. The distance covered to that point was 8.7 km [Total 19.1 km] with an elevation of 620m.
At 13h03, we reached a three pronged jeep track. The trail markers indicated that we needed to go straight on along a narrow path. Once again, Arangies took us up an incline and away from the much easier jeep track. Looking behind us, we could see how far we had come from the summit where we had sat just a few hours earlier. What a sight that was!


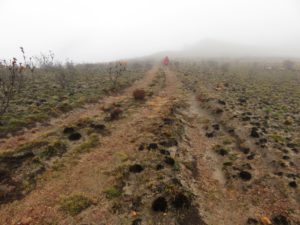
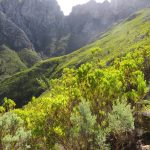
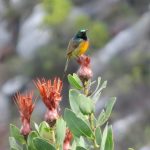
There is a wide variety of plant life along the trail. Along with the many proteas, you will come across very beautiful and delicate flowers right at the ground level.
At 13h20, we reached the highest point along that path and began to descend again into the valley and toward the end of the hiking trail. The distance covered to that point was 9.5 km [Total 19.9 km] with an elevation of 562 m. At 13h45, we reached a jeep track and turned right. The distance to that point was 10.5 km [Total 20.9 km] with an elevation of 393 m. Two minutes later we turned left again.
At 13h51, we crossed a wooden bridge and shortly thereafter we arrived at the end of the hike. The bridge didn’t look like it would take our weight, but it did. The total hiking distance on Day 2 was 10.6 km. We still had to 1.3 km back to Dassiehoek 1 hut to where our bakkie was parked.
Trail Markings
There was only one distance marker on Day 2 and that was at the 4 km to go mark.
The trail for Day 2 had a total walking distance of 10.6 km. It is probably a little longer if you had to include the distance to the gates of the Nature Reserve.
Total Stats for the Hike
Here are the hiking stats for the entire hike (including the extra 1 km on Day 1):
| Trip Odometer | 21.0 km |
| Total Time | 13h59 |
| Moving Time | 08h17 |
| Moving Average | 2.5 km/h |
| Overall Average | 1.5 km/h |
| Max Speed | 9.1 km/h |
| Elevation | 355 m – 1696 m |
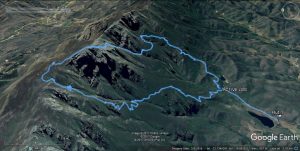
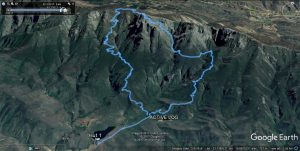
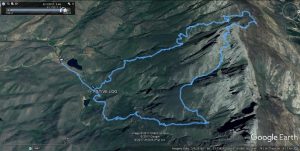
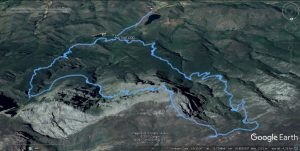
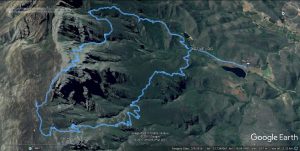
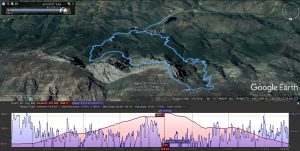
I have attached a GPS trip log for the hike, including a side elevation profile. Click on the images to enlarge them.
Closing Remarks
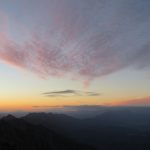
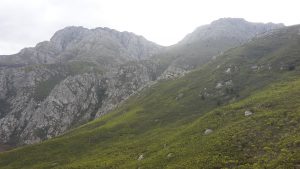
We all found Day 2 to be far more physically demanding and technically challenging than Day 1. This blog gives you some idea of what to expect when you do this hike, but it can in no way convey to you the magnificent scenery and spectacular views that you will enjoy when doing it for real. A camera is just not able to capture all that this trail has to offer.
We all thoroughly enjoyed this hike and have in fact completed a second and third hike there with the hiking club friends who were not able to do it with us the first time.
One footnote to add though before I close is that you need to be physically fit to do this hike and have at least some experience in hiking up and down a mountain. Some of the sections of the trail were quite tricky and it is entirely possible that you could slip and fall and hurt yourself if you are not careful.
There we were, a group of us from CNC + Cumhike +others doing a training hike for the ” Boland 90 ” challenge. Most, hardcore, experienced hikers, having done the trail a few times clock + anti-clockwise b4, blazei enuf to carry a small TV +car battery up with us to watch the rugby final world cup. We had to jury rig the solar panel on site with 2 wire coat hangers+battery for a good picture, as per Murfy’s law the holder of the wire connection fell off the top bunk in his excitement as Joel was about to kick. TV died ! A frantic scramble for a few seconds ( felt like hours ) and the first picture we saw again was the ball soaring thru the poles on a replay. We always enjoyed Arangies as one of the highlights of the trails in RSA . Specially when the farmer from Koo side brings up snow visitors on a 4X4 tractor/trailer ( he owns the hut) and donates a cupl bottles of his muscadel to us. We been fortunate to do the trail in different conditions many times but always been in aw of the beauty of this trail..
Hi there Aundre. Those sound like some fond memories. I hope to make more of my own on this mountain in the years to come. Thanks for your interest shown in the blog!